Sunday, August 26, 2012

Week 17: Low Voltage--fewer Watts than Expected


This is electricity week! Our Bellingham son-in-law, Chris, changes the chip in the time-lapse camera in anticipation that there will be lots to see.  


Ditto


While we're waiting for the electricians, our new kitchen window is installed: two mulled windows-- each of which opens to let the cool northwest air into the kitchen.  The window glazing is obscure (frosted) glass as a courtesy to our neighbors, whose bedroom window directly faces our kitchen window.


Speaking of windows, we forgot to mention in last week's log that most of our new windows are coming from Sierra Pacific.  We liked the quality and style of the windows, the prices were very competitive, and a bonus, as we saw it, was that the window manufacturing plant is in Red Bluff, CA, which means that we're making some contribution to the California economy.  We later learned more about Sierra Pacific.  They are apparently a third-generation family-owned and operated forest products company that owns 1.9 million acres of trees in California and Washington (the largest private forest land owner in North America) and operates 12 sawmills, 8 co-generation facilities, and 4 wood re-manufacturing plants in California and Washington, employing 3400 people.


While we awaited the electricians, the HVAC people also did some more work, including installing the ceiling heat registers throughout the second story.  This photo shows the heat register in the new upstairs bathroom.


We also encountered one of many of the local code catch-22s that have entertained us during the project.  There is a code provision that requires a house to have an exhaust fan hooked up to a timer that turns the fan on automatically several times a day.  The purpose is to create negative pressure in the house, which is intended to draw fresh air in any time someone opens a door or window.  The code does not explain why this is necessary in a remodel of a house, the entire first floor of which leaks fresh air like a sieve.  But that's not the catch-22.  The catch-22 is that we are not finishing the basement (i.e., we are not insulating or putting drywall in the basement).  We are simply using the basement for storage and the clothes washer and dryer.  Under the code, this means that, for energy purposes, the basement is not part of the house.  Our original plan was to have the exhaust fan that goes on and off several times a day here in the basement (in this photo the BB is holding the fan up to the vent pipe where it will be installed).  But we have been told that since the basement is not considered part of the house, the automatic fan must be upstairs in the bathroom. This does not mean, however, that we can eliminate the fan in the basement.  So now we have two fans, and the automatic fan is in the bathroom where we can enjoy its whirr and buzz several times a day.


This is the fan in the bathroom that will be placed on timer per the local energy code.


While we were waiting for the electrician, we also completed the framing for the new cabinet that will go over the fireplace.  On the left there is an enclosure for the exhaust flues serving the range hood, the basement furnace, and the gas fireplace.  This will be fully enclosed with drywall.  On the right there is new framing where the chimney used to be, and a new oak cabinet will fill this space.


Ditto

While we wait for the electrician, the BP holds up the electrical plan for the basement, first floor, and second floor, which has been over six months in the making.  We are very excited to see all the squiggles on the plan translated into electrical circuits, fixtures, and switches in the field.


This is what a double crew of electricians looks like when they aren't there.  The original plan was that the electricians would start on Monday; then we were told Tuesday; then we were advised that a double crew would be arriving on Thursday.  Two electricians did arrive on Thursday and worked for much of the day.  We never found out whether two electricians is a double crew; they made some progress, but were a good four days behind schedule, and so committed to continue their work on Friday and Saturday.  Two electricians worked part of Friday and one electrician worked for one or two hours on Saturday.  We're now a good week behind schedule.  Our general contractor has been terrific and is aggressively working to get us back on schedule.  We do believe that next week will be more electrifying than this week.


Ditto


The entire 200 amp electrical service for the house will ride on these three massive electrical cables.  On the ground in the lower right of this photo is the old electrical panel.  We are adding many new circuits in this remodel, so we'll end up with a new panel with much larger capacity.


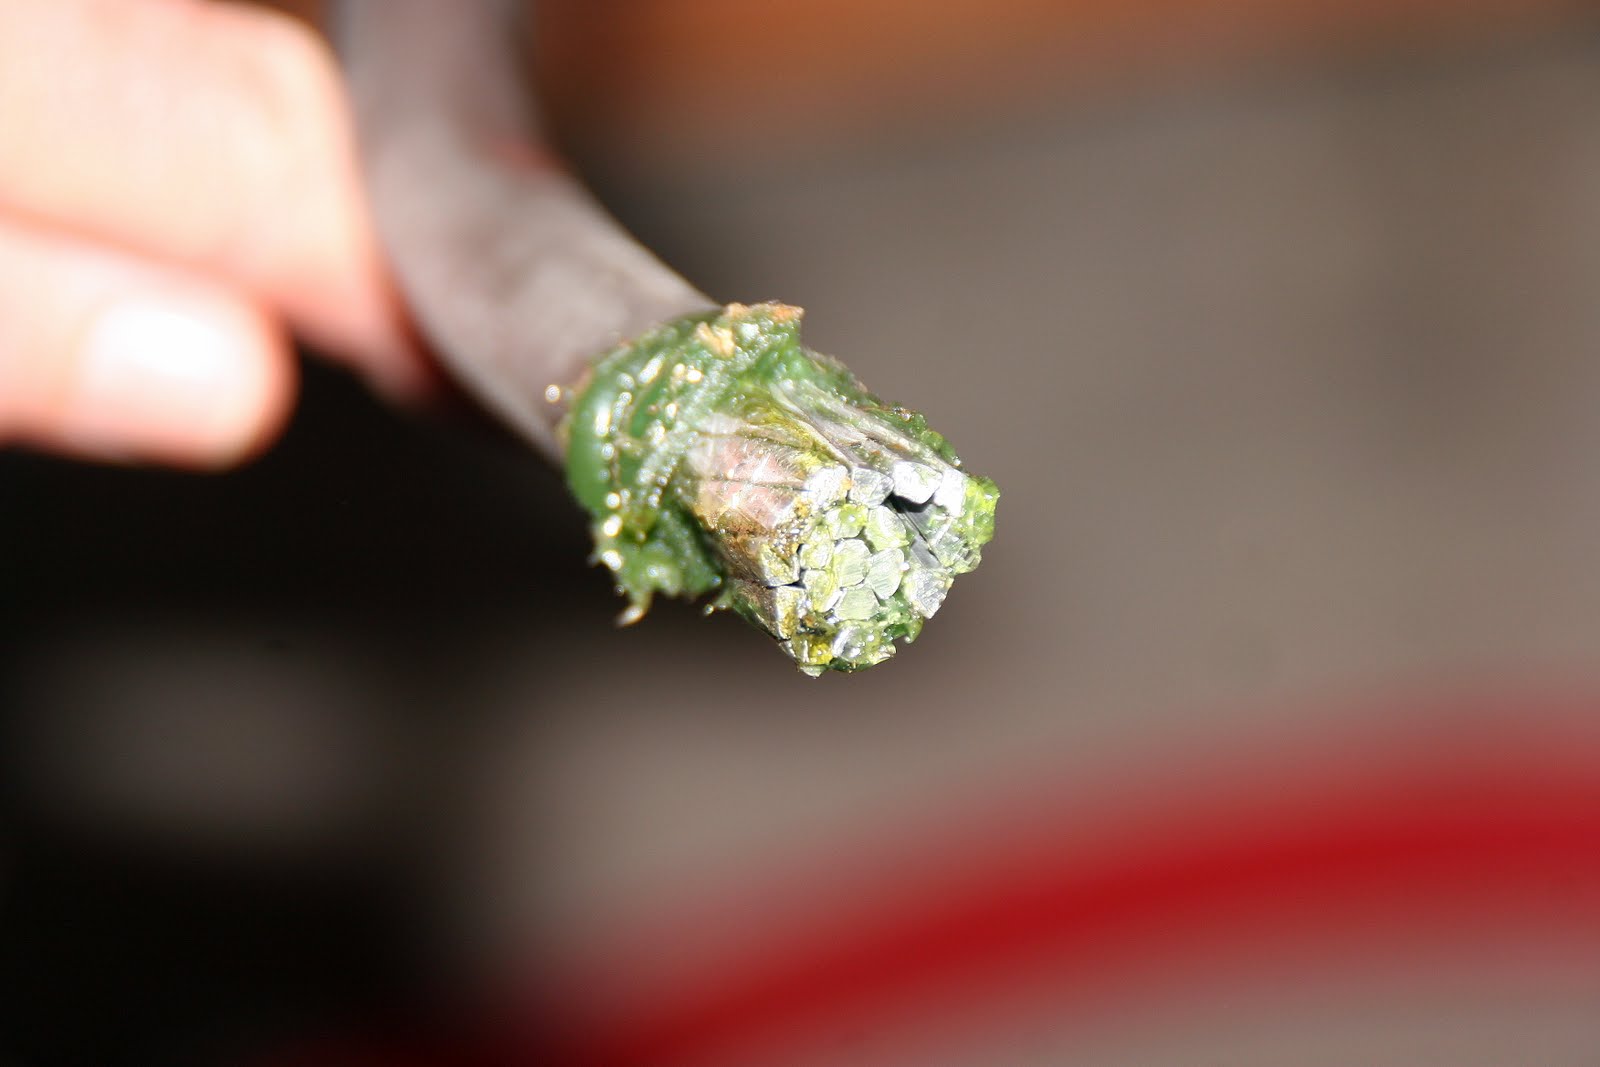
This is one of the three massive cables mentioned in the previous picture.  There are 20 individual wires bound together in this cable.


The crew did get a few outlets, switches, and fixture cans placed.  Something that you don't think about until you do a large installation like this is where to put switches and outlets and how to be sure that fixture cans are properly centered on the wall.  It has taken a surprising amount of our time to follow the electricians around with electrical plan in hand, double checking the position of each of these devices.  Also surprising is the number of times we've found that the location of a device in the plan needed to be changed in the field.  The electrical installation turns out to be one of the most detail-intensive activities for us as well as for our contractor and electrical sub-contractor.


More electrical devices and the very beginning of pulling wire to the various boxes.  So far, all the wire being pulled is electrical wire.  We also are installing data, TV, and phone cabling in many locations throughout the house.  We want to be able to plug in a TV or computer just about anywhere, and now is a good time to install terminals that enable us to do that.


This photo shows the cans for the four recessed lights that will be installed in the BB's office. 


This is a close-up of the recessed light cans that we're using.  The manufacturer is Juno, and we decided to use 5" cans, which are significantly less expensive than 4" cans but look better to us than 6" cans.  Altogther, the remodeled house on all levels will have a total of 59 light fixtures, 19 of which will be 5" Juno cans with dimmable LED bulbs.  We also will have a 4' LED strip on the bottom of the cabinet that is over the kitchen sink.  The rest of the fixtures in the house will consist of 8 fluorescent tube lights, 6 low-wattage halogen lights (used mainly in closets), and 25 regular fixtures, all but a few of which will utilize low-energy fluorescent lamps.  Many of these regular fixtures will be recycled from the existing house, 2 will be recycled fixtures we will be bringing with us from Berkeley, and a handful will be newly purchased.


While the remodel has effectively destroyed most of the landscaping in the backyard, a few brave plants along the borders continue to thrive, and we keep them well-watered. 

Sunday, August 19, 2012

Week 16: Our Corner of Oz: Plumbing, HVAC, and Windows, Oh My!


The water pipes and valves are in for the upstairs walk-in shower.  We learned that these days copper water pipes are out (too-costly) and PVC pipes are in.  One nice thing about PVC is that it's color-coded (sort of); red always means hot, white means either hot or some mixture of hot and cold, depending on where the pipe is.  In this photo, the larger black box in the center of the picture is the hot/cold water mixer, and the two smaller boxes above govern the volume of water pressure to the main shower head (on the right) or the hand held sprayer on the left.


In the upstairs bath, water pipes and drains are also in place for the two-basin vanity that we plan for this space.


This photo was taken in the kitchen.  Both here and in the upstairs bathroom, pressure gauges are put on the water lines and drain lines to verify that there are no leaks.


In this corner of the kitchen we have water for the refrigerator.  Probably old-hat to all of you, but a big deal for us, as this will be our first refrigerator with water and an ice maker.


We find that at least once every couple of weeks there is a "what the hell is this?" moment.  This week's moment occurred when we spotted this one-inch white PVC pipe running from somewhere upstairs through the kitchen ceiling and walls to somewhere downstairs.  It turns out this is not plumbing.  This is HVAC.  The new furnace that we're installing upstairs generates up to 5 gallons of condensate per day during the winter, and this pipe carries it to the sewer drain in the basement laundry. We considered having it run to a rain barrel to conserve water for plants, but the condensate will be at its maximum during that part of the year when everything else is flooded as well.


This photo is not a blow-up of a microchip.  It is the current wall of our basement laundry room.  The black pipes are the drain for the washing machine and sewer vents that go all the way through the house to the roof.  The red and smaller white pipes are water pipes for the washing machine.  The larger white pipe is the aforementioned condensate drain.  The vertical silver pipe is the vent duct for the clothes dryer, and the large silver duct work tied to the joists is the heating duct that serves our new dining room.

A closer look at the new duct that will transport heat from the basement furnace to the dining room.  When the project is completed, we will have two furnaces--the basement furnace that we had before the project started will continue working to heat the first floor.  The new furnace upstairs will heat the second story.  This was a cheaper and more efficient solution than trying to beef up the basement furnace to heat the entire house.


This is the new air return for the existing basement furnace.  The air return is being relocated for two reasons: the first is that we had to slightly move the location of the existing furnace to make room for the shear wall in the basement.  The other reason is that the geniuses who installed this furnace many years ago put the air return in the living room and never properly connected it to the furnace. 


This photo proves that this time we will have a real air return that is actually connected to the furnace.  There will be a grate installed over this opening to prevent the BP from stepping in it.


This photo of the west wall of the kitchen shows HVAC flues running from the basement furnace and the gas fireplace (the pipes on the right) and the flue that will vent the hood that will be installed over our gas range.


While the plumber and HVAC people have been hard at work, Chris has been applying insulation to the air space between the old first-floor ceiling joists and the new second-floor floor joists.  Since the second floor essentially floats on posts about a foot above the first floor ceilings, the intervening space needs to be insulated.


This photo shows the view of the insulation from inside the living room.  The yellow wire is either a complex installation designed to serve an extraordinarily intricate pattern of lights and other electrical devices, or it's just a random clump of wire awaiting the beginning of electrical rough-in that starts next week.  We are voting for the intricate pattern of lights and devices.


Dave, Jake, Chris, and Casey all assembled this afternoon to install the windows.  They made amazingly quick work of it.  Within a few hours, all but two windows were in place.  In this photo, Dave, Jake, and Chris work from the outside, and Casey works from the inside in installing the three-window mulled unit in the south wall of the dining room.  In ordering multiple windows, we had the choice of ordering individual windows and framing them separately or having the multiple windows mulled (i.e.,seamlessly attached) at the factory.  We elected mulling, partly to save labor costs, and partly to wind up with a more compact window design.  We're glad we did it this way.


An inside shot of the guys installing the mulled window unit on the west wall of the dining room.


The only two windows not yet installed are the large mulled unit in the second story south wall of the bedroom (in the center of this photo), and the small recycled window that will be on the south wall of the closet (the small opening on the left.)  The small recycled window is updated with energy efficient glazing.  The large bedroom window is being left until later so that drywall can be delivered by forklift through the opening in the bedroom south wall.

The BP sneaks a look at the park through the BB's new office window.

The BB admires the same view through the same window.

The remodeled house with most of its windows installed at the end of the week.  Next week, we are told, will be ELECTRIFYING!

Sunday, August 12, 2012

Week 15: Stairs and Other Things

The major items this week were framing, HVAC rough-in, and plumbing rough-in.  We begin this week's blog with a few framing photos.  In this photo, the elevator machine room has been framed in.  The BP is inside the machine room searching for the elevator.

The stairs have been framed!  The stairs are in two flights separated by a landing.  In this photo, the lower flight takes off from the living room and runs to the landing where the BB is standing.  Some of the windows for the addition are on the right, wrapped in plastic, awaiting installation in the next couple of weeks.


This picture was taken from the landing and looks up to where the BB is standing at the top of the second flight.


A view of the second flight looking down to where the BB is standing on the landing.


Under the stairs there will be an access door to space under the staircase and landing, which we will use for storage.  In the front three feet or so of space under the staircase, we will install a rod and use it for a coat closet.


This photo shows how we have dealt with a head space problem protruding into the BB's office.  The lower part of the "box" in this photo is framed headroom necessary to provide adequate clearance for the first flight of stairs that is immediately below.  We decided to build a frame on top of this head space, which will lead to a table top 30" from the floor.  The BB will use the table top as a work table.  And the cubby hole between the table top and the top of the head space frame can be used for miscellaneous storage.


The HVAC rough-in included installation of the furnace that will provide heat to the upstairs.  It is a gas-burning 95% efficiency furnace that will provide heat through ceiling registers in each of the upstairs rooms.


In a corner of the master closet, the HVAC folks installed this air return, which will provide air to the furnace.  The furnace filter is attached to this return, which will make the filter easy to change and also will provide filtering at the air source rather than at the furnace--both positive features.


It seems that no sooner have we gotten a roof on the house that we begin poking holes through it.  In this photo, two large stainless steel pipes on the left provide venting for the basement furnace and the gas fireplace in the living room.  The two smaller white PVC pipes on the right provide venting for the upstairs furnace.


This additional vent, not visible in the previous photo, is for the vent-hood that will be over the gas range in the kitchen.  For technical reasons that only the BP understands and rarely discusses with others, the range vent is considerably larger than the vents for the furnaces.


This photo, taken from the kitchen, shows the vent pipes serving the basement furnace (the left pipe) and the gas fireplace.

Somewhere in the chain of ownership of this house, there was a genius who installed an exhaust fan in the downstairs bathroom and vented it nowhere.  In the center of the photo, we have corrected this omission by running vent pipe from the exhaust fan through the bay between the upstairs joists and downstairs ceiling joist and out the rear of the house.  The exhaust fan is now fully vented.  In this photo there is also some plumbing pipe installed by the same genius, some of which we can actually use for venting, but the rest of which we have felt it best to abandon.


This week the plumber began roughing in the plumbing to the upstairs bathroom, including water supply and waste drains for the two-sink vanity, the toilet, and a walk-in shower.


Our California granddaughter, Tessa, age 7, flew up to stay with us this week.  She was a joy to have with us and was eager to help any time we visited the construction site.  In this photo, Tessa holds up an example of the safety rings that were permanently installed in the roof when the roofing shingles were installed.  These rings, near the ridge of the roof, provide stable rings for safety ropes and obviate the need to nail temporary safety equipment to the roof.


Tessa was eager to be useful.  Her first choice was a nailing gun, but she cheerfully accepted the alternative of a broom.  Her comment was that there was a lot of stuff on the floor, and it really needed sweeping.  Our contractor put her to work.  The labor laws were not violated because this fell more in the realm of wish fulfillment than child labor.  Tessa was not fooling; she managed to sweep sawdust and debris into neat piles in every single room!


Ditto.  The BB and Dylan admire Tessa's progress.


Ditto

Mid-week, Tessa's mom, Amy, and brother, Grayson, flew up to spend the rest of the week with us.  During the entire week, Susan and Chris opened their home to Amy and the kids, and the four cousins and their parents and grandparents had a wonderful time.  In this photo, Amy and Grayson get their first look at the construction site.


Grayson tries on a real construction hard hat.  It looks like he has put it on backwards, but he assured us that this was not the case.  The black band is a really cool Star Wars eyeband.


A view of one of the basement walls.  This is what grandkids do when the BP takes too long to explain a technical point that is otherwise enthralling.


An earlier photo of the front porch that shows what we thought were massive white beams holding up the roof structure.  These apparent beams extend from the side of the house out to the vertical black ironwork.  On a hunch, our contractor opened one of the apparent beams, and the following photo shows what he found.


Just to the left of the center of this photo, you can see that the massive beam was, in fact, a false beam inside of which was a pathetic 2x4 nailed to the house siding.  If this had been offered as the answer to an exercise in engineering school, it would have earned an "F" grade.  On the other hand, this structural travesty has survived nicely for 87 years, so who knows?  We decided not to tempt the fates any further, and our contractor added new structural support to replace the old.


This photo shows the structural additions.  A 4x6 beam has been added to replace each of the former 2x4s, and the 4x6 is anchored to the house at a mini shearwall.  The false beam panels will be reinstalled so that the visual effect will be exactly the same as the original look.


Some views from the second floor--this is our best view of Bellingham Bay, looking south from the bedroom window.


When it's foggy, we look west from the bedroom window and pretend that this is Bellingham Bay.


A view of Broadway Park opposite the BB's office window.


A view of Broadway Park opposite the BP's office window


Looking west along South Park Drive from the BB's office window


Looking east along South Park Drive from the BP's office window