Sunday, December 9, 2012

Week 32: 4th Down on the One-Yard LIne


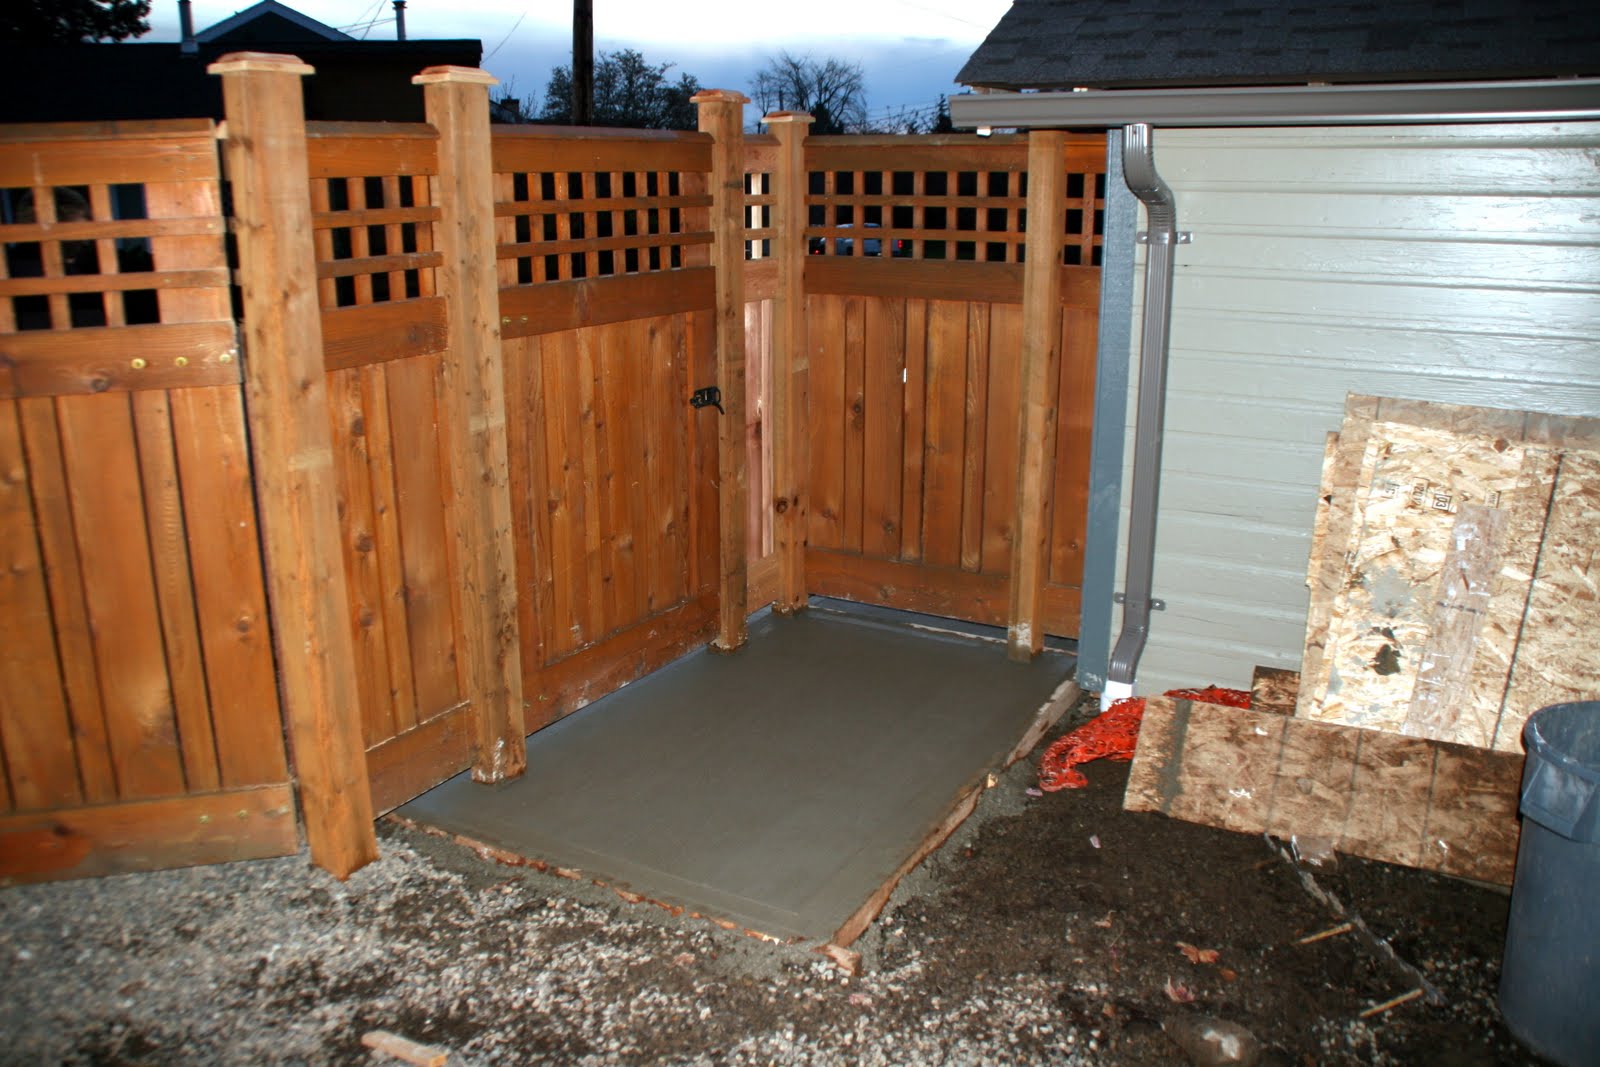
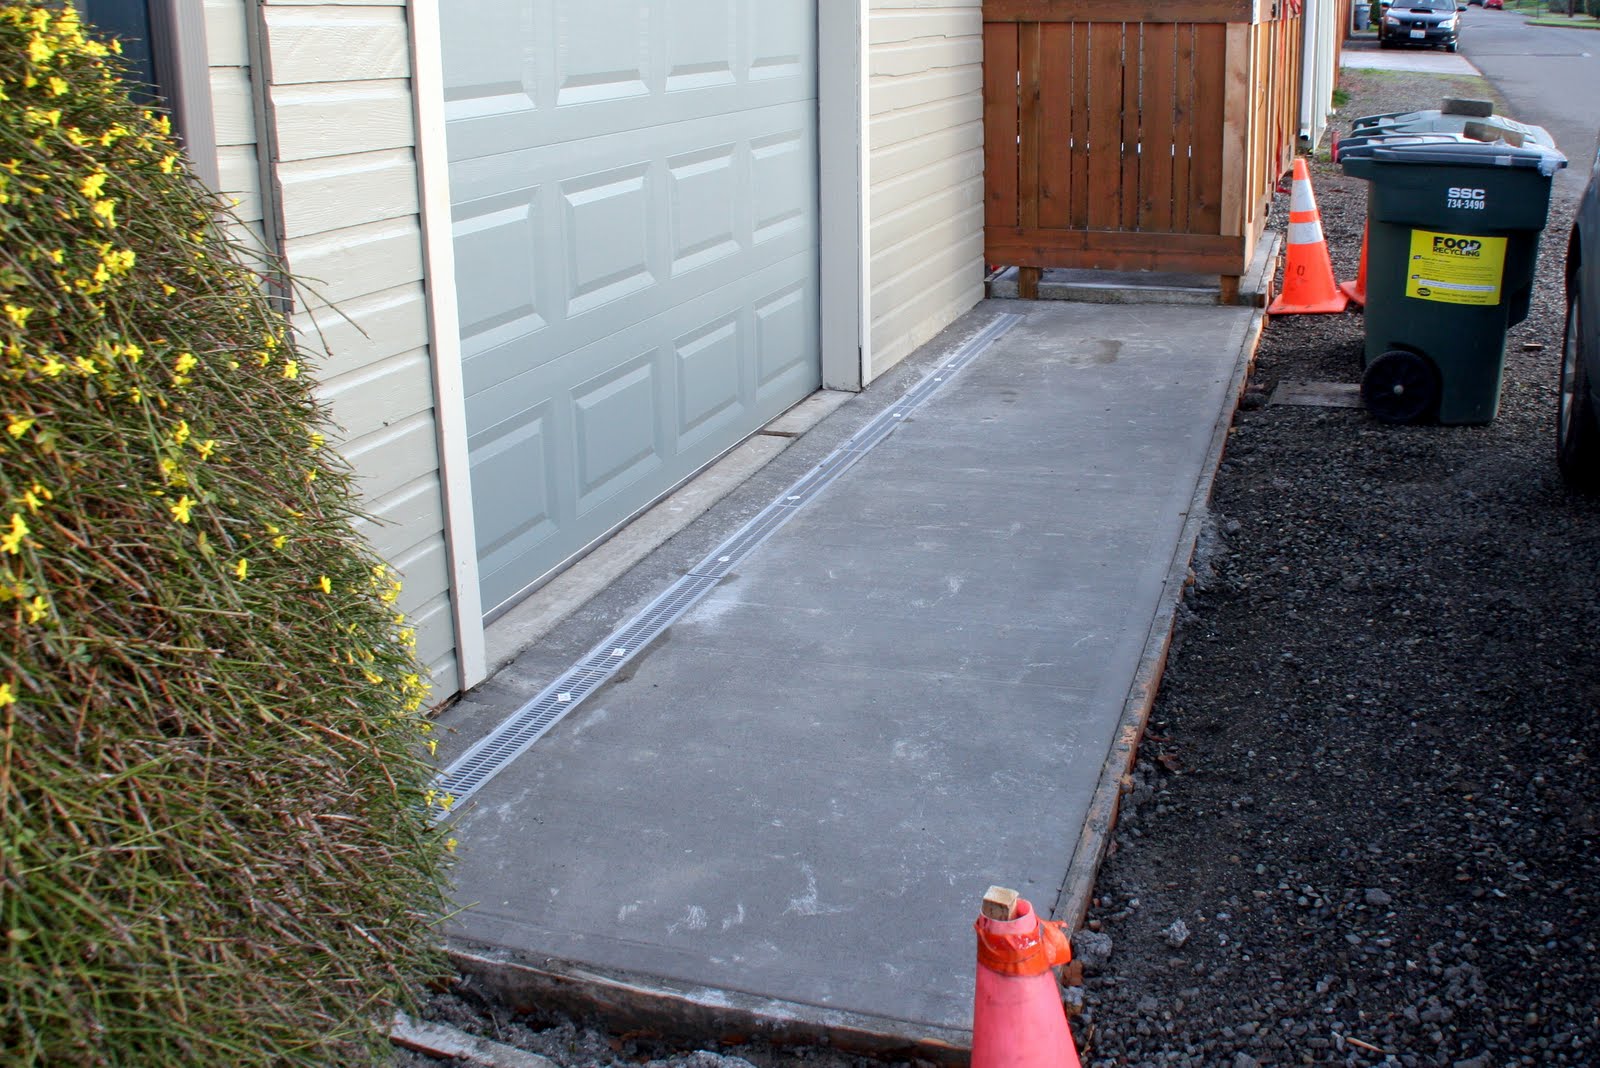
This photo shows the cured concrete apron and drain grate installed in front of the garage.  We anticipate this making a huge difference in keeping water out of the garage during the occasional rains we have here in Bellingham.


This photo of the new laundry room shows the elevator door on the left, newly installed cabinets on the walls, and the washer and dryer in place, although not yet fully installed.  We have taken pleasure in recycling wherever we can.  The base and upper cabinets on the right wall and the upper cabinet on the far wall were all in the mud room of the pre-remodel house.  We are using them again here in the laundry room.  The base cabinet on the far wall is one of the base cabinets that used to be in the kitchen of the pre-remodel house.  The freestanding cabinet in the front of the photo is a base cabinet that Susan and Chris built and gave to us when they remodeled their house.  At the end of the project, this cabinet will move upstairs to the pantry, where we will use it  to store pots and pans.


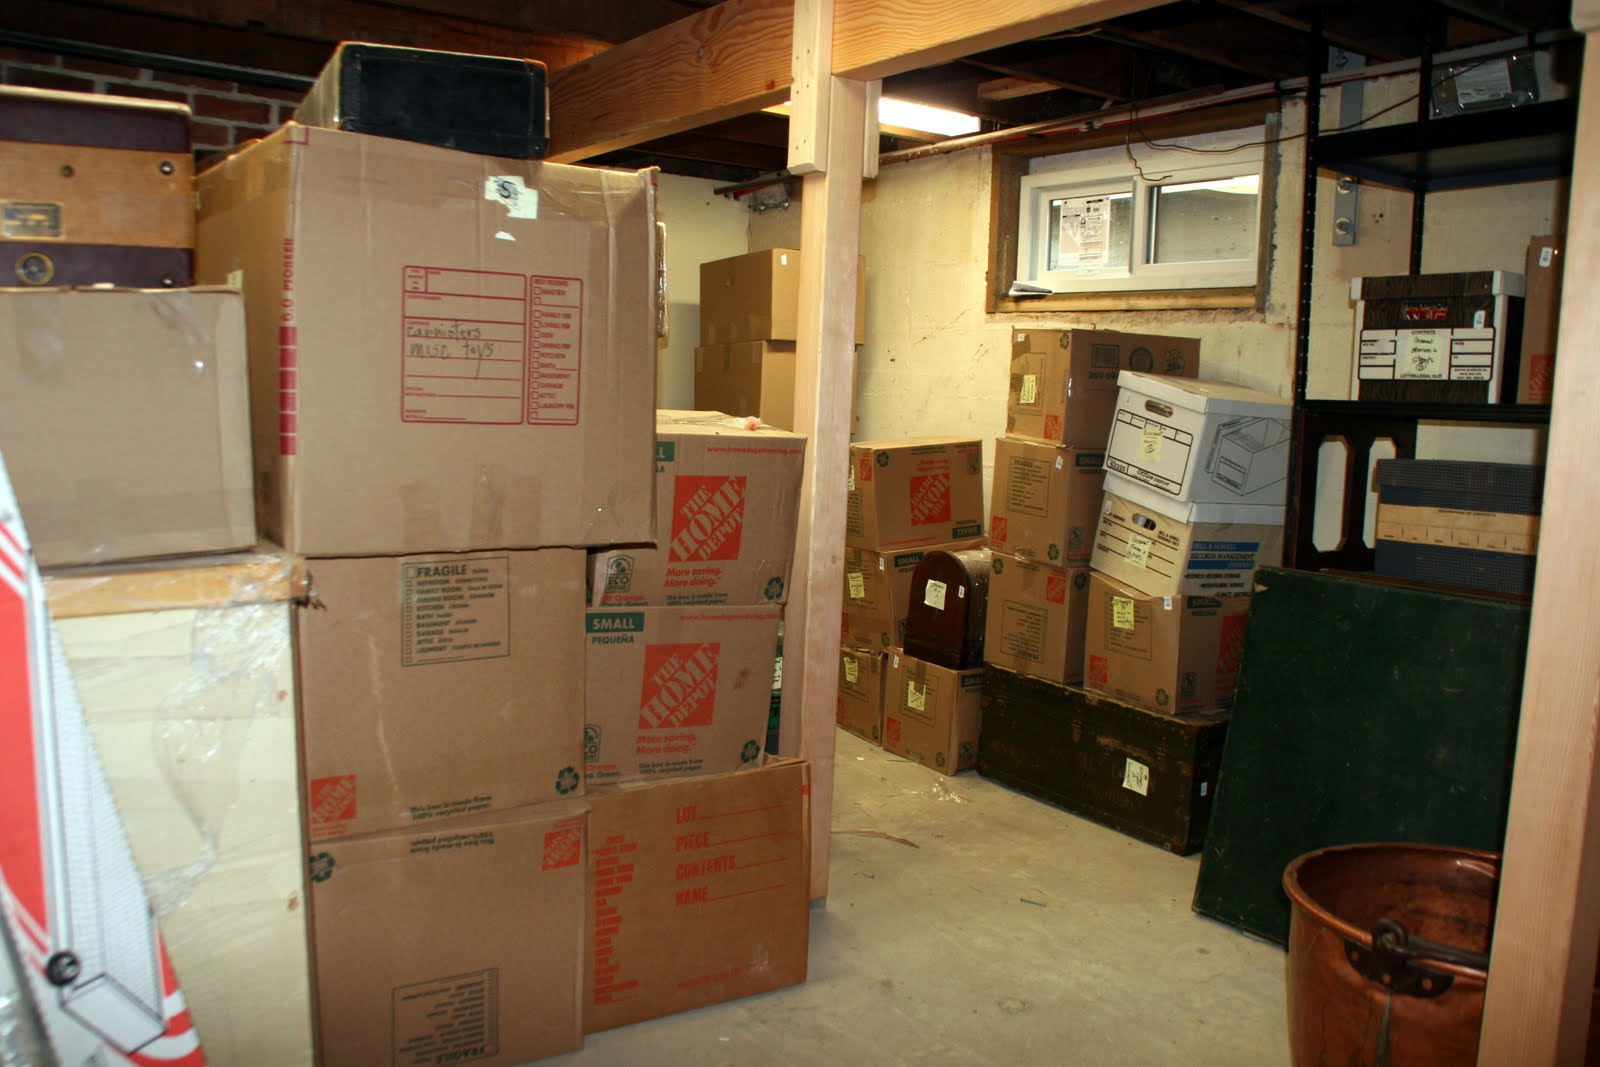
This is the basement room adjacent to the laundry.  This photo shows some of the Berkeley possessions we're storing here pending our ability to occupy the entire house.


This photo shows the rehabilitated crawl space in the old furnace room.  Bellingham Bay Builders installed several new footings in this space to help support the second stories of the house.  When they were done, they raked and graded the earth and covered it with thick vinyl.  It's nicer space than it's ever been before and will make it much easier for the BP when he makes his biannual crawl through this space to open or close the foundation vents.


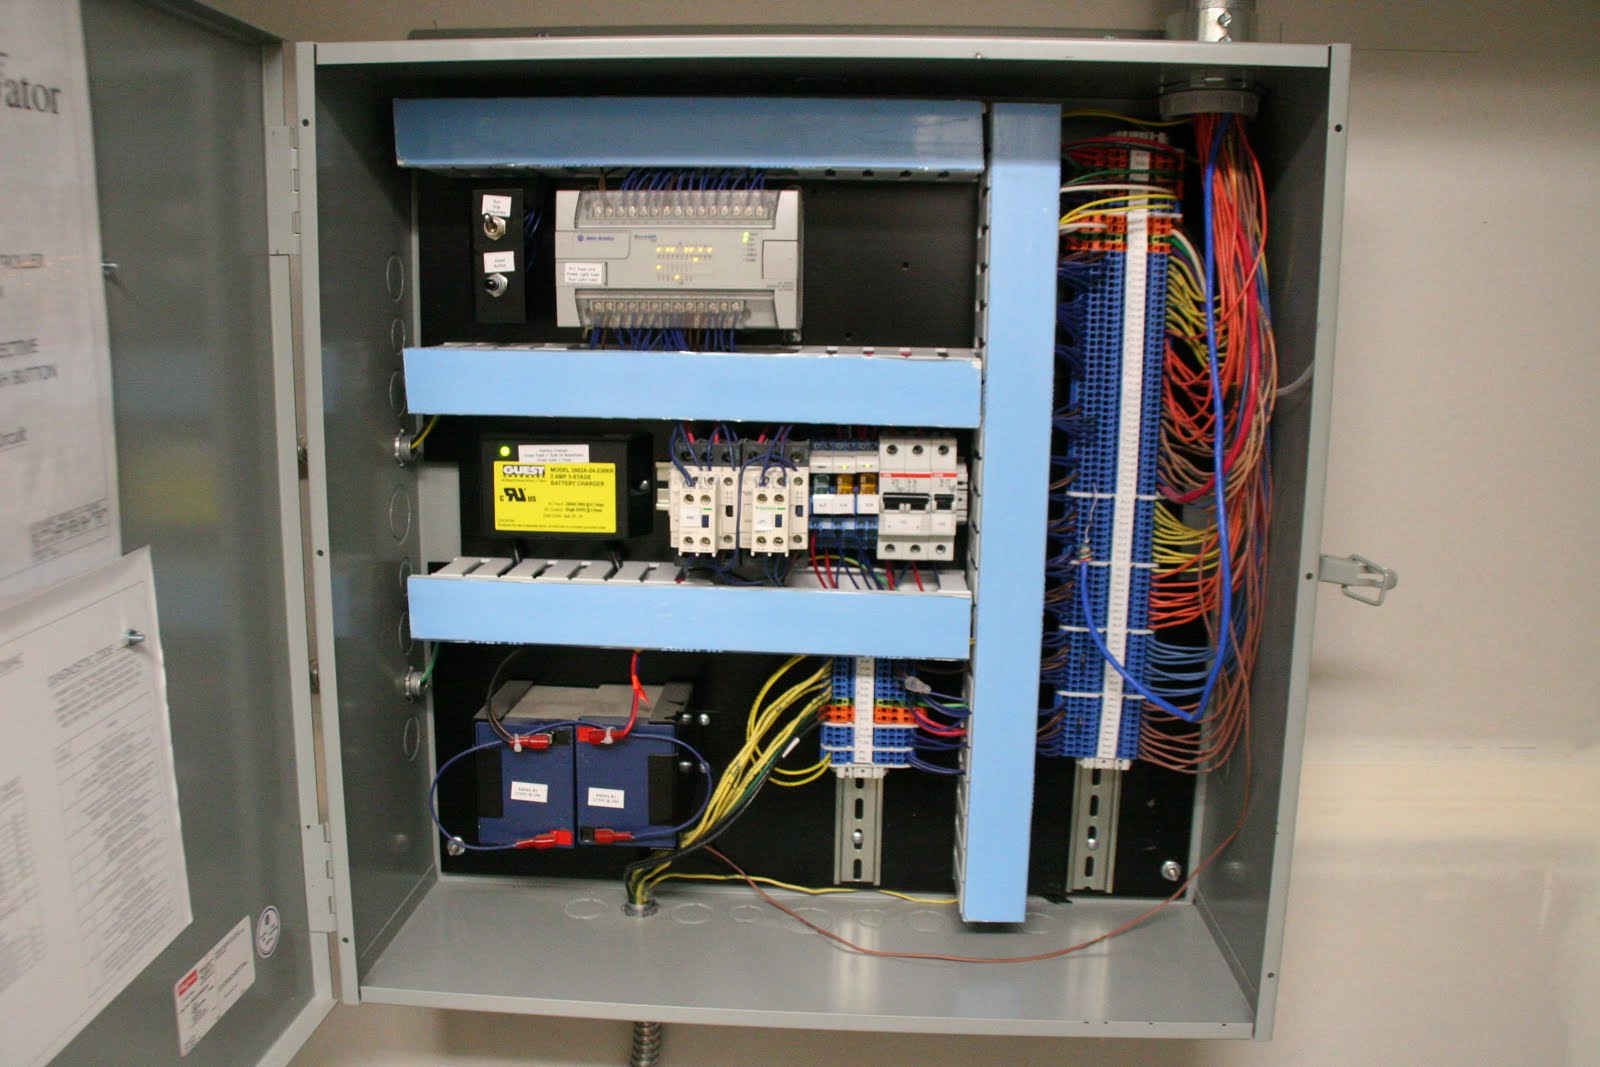
This photo shows the fully wired media panel.  The panel contains coaxial cables and ethernet cables for television and internet service to a total of ten locations in eight different rooms.  At any particular time, we will only be using two or three locations, but if and when the need arises to change any locations, we have plenty of choices.  The panel also contains cabling for landline telephone service to the elevator and four other locations in the house.


It's hard to believe, but we really are very close to being finished, and we find ourselves shifting gears from big picture issues to checking minute details to make sure everything is complete and working correctly.  In this photo, the BP is checking off items on our nine-page punchlist.


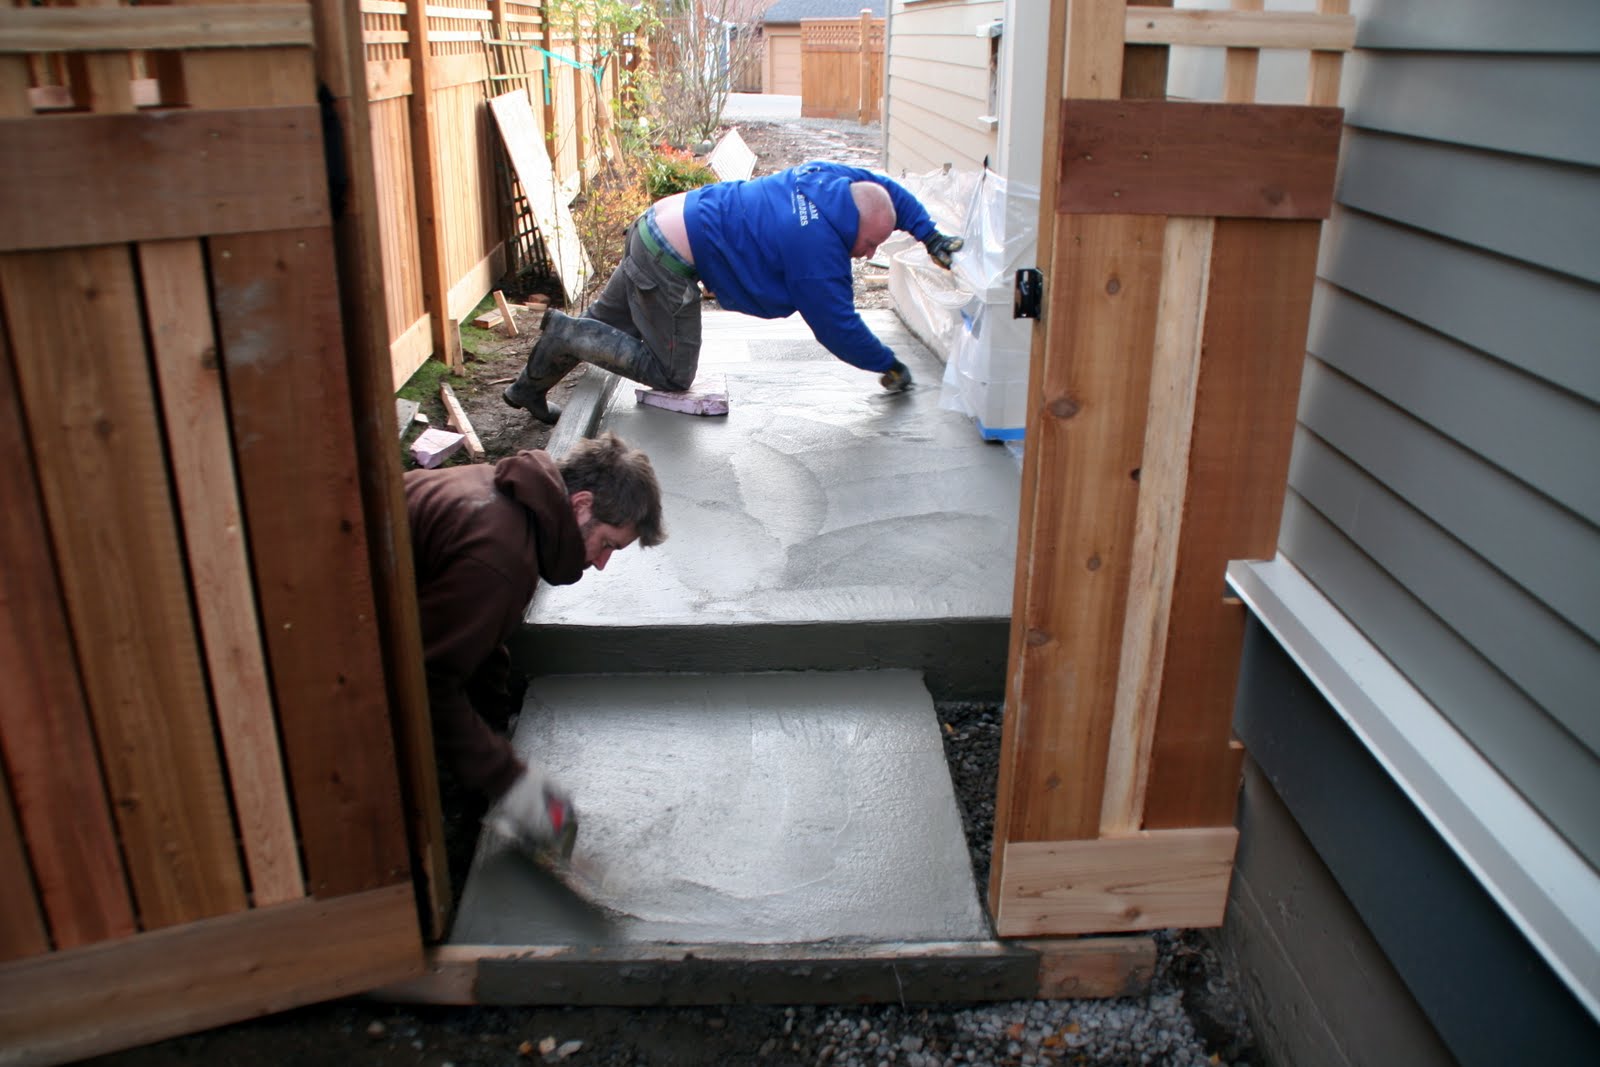
Every time we think most of the debris is gone from the yard, Dylan brings in another trailer and manages to fill it.  This is the beginning of the eighth month of construction, and during that time, a whole lot of debris accumulates!


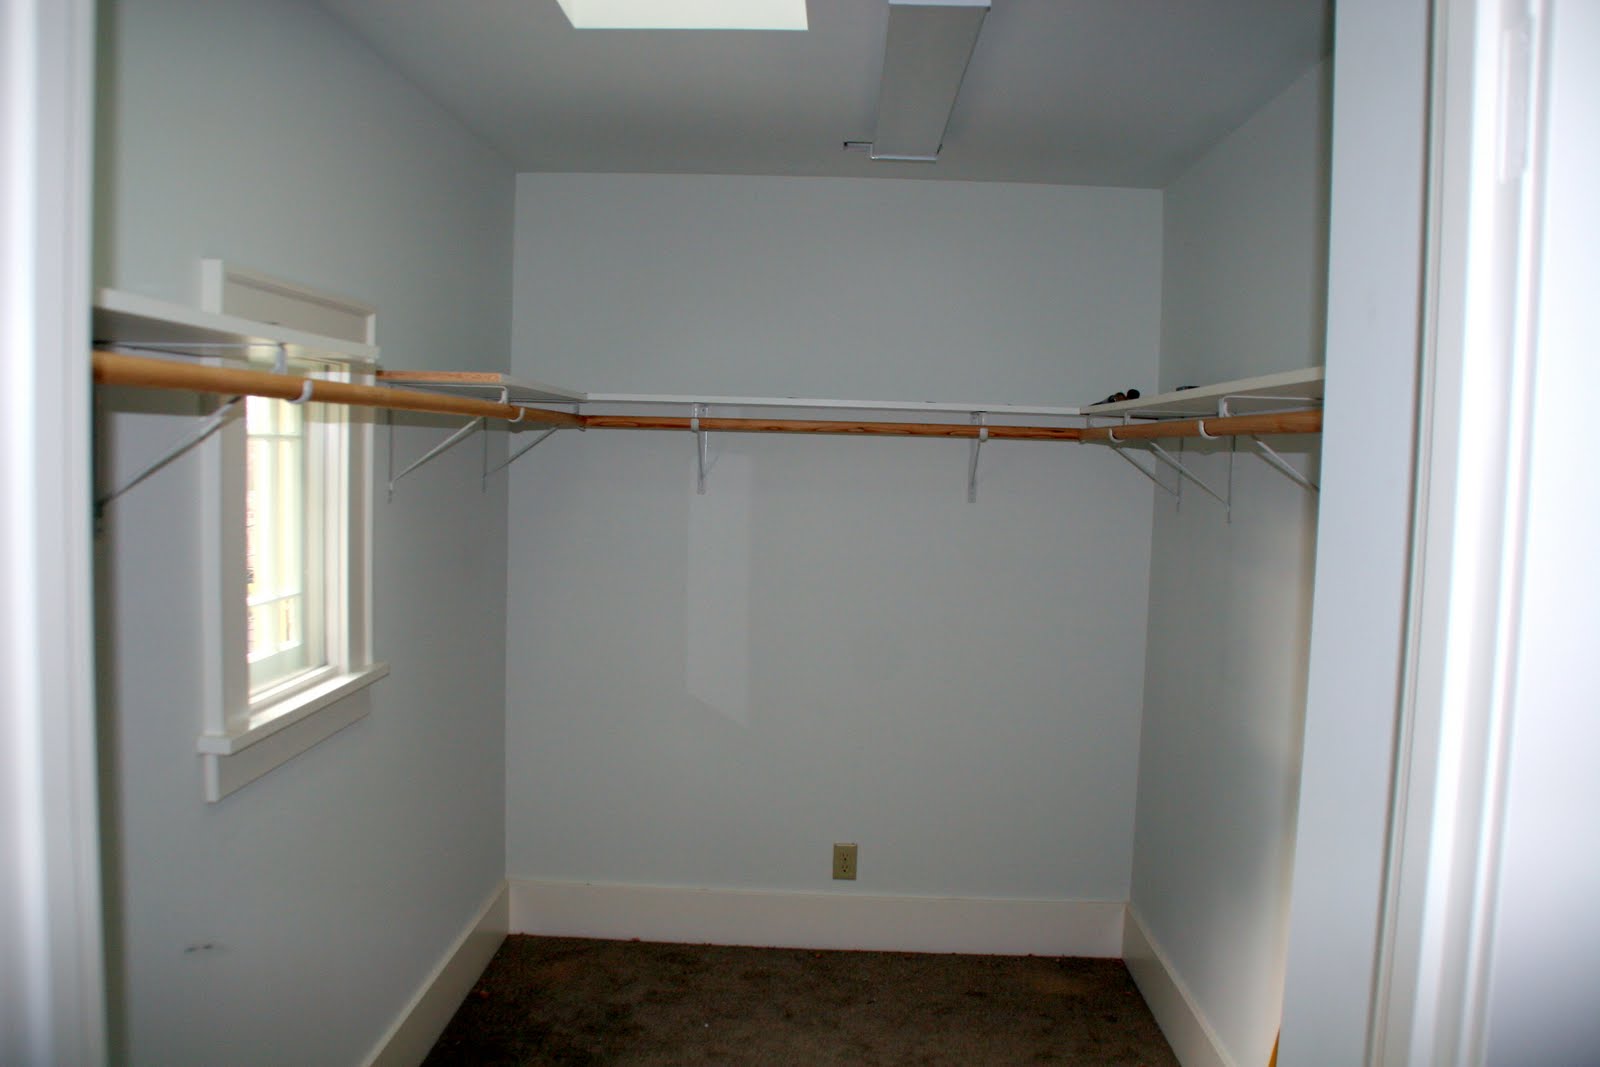
Shelves and clothes-hanging poles have been installed in the closets.  This photo shows the poles on three walls in the master closet.  This is the largest closet that the BP and the BB have ever enjoyed in their entire married life.


This not very good photograph shows other details going on--in this case, a 48" grab bar has been installed inside the shower; on the left outside wall, a double towel rack has been installed; and in the upper right of the photo, you can see a robe hook that's been installed.


This photo shows one of two 36" grab bars that are being installed in the toilet area, and also the tissue holder that's been installed.  The BB and the BP purchased all of the bathroom accessories online; the good news was, they found exactly what they wanted; the surprising news has been that it's taken eight weeks for most of them to arrive, and there are two towel racks that haven't turned up yet.


The work table in the BB's office has now been fully completed.  Our granddaughter, Maya, has advised us that the cubbyhole is not a good place to store things; it's a much better place to rest your head when you're tired and even crawl into if you feel like hiding.


Sue and her family are visiting the BB's office.  The BB, Sue, and Chris pose for a photo taken by Maya with her very own camera.  Zoe elected not to be in the photo and preferred to study the recessed light in the ceiling.


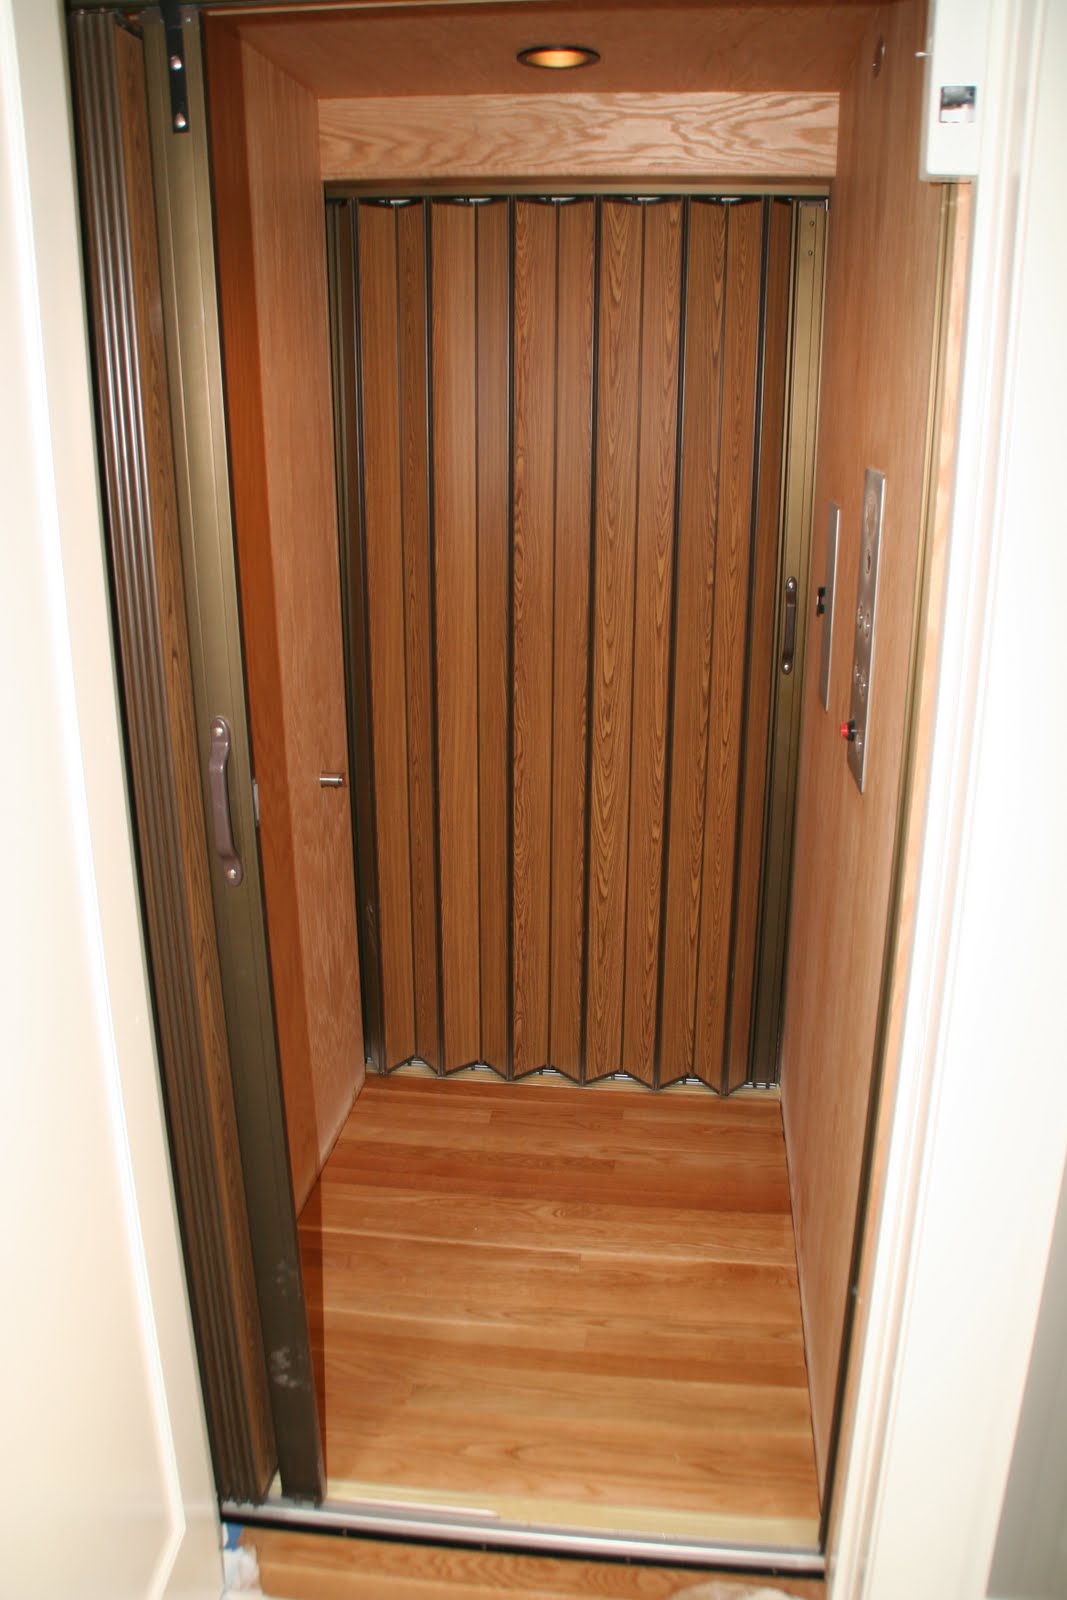
Late last week, the state elevator inspector gave his final approval for the elevator, and all elevator finishes were completed except the oak floor, which was the task of Matthew, who has handled the new and refinished oak floors throughout the house.  This week Matthew installed the oak floor in the elevator cab, and this photo shows the now fully finished cab.


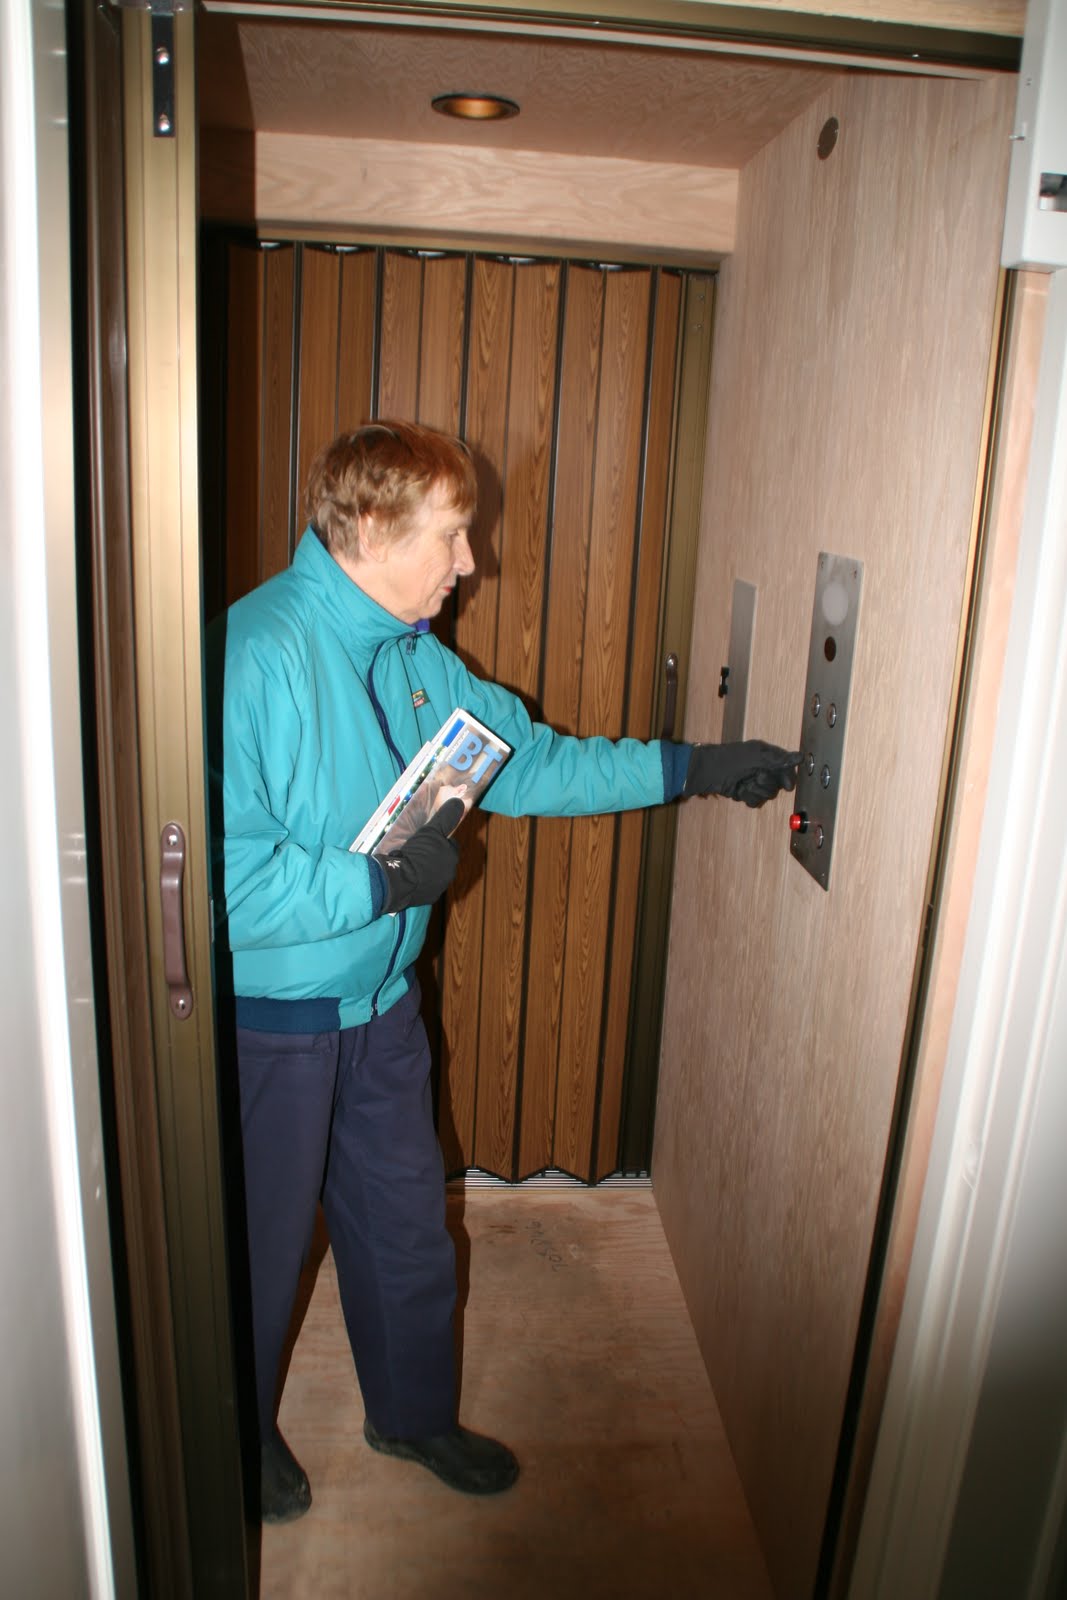
Sue and her family were the first official guests to ride in the elevator.  In this photo, Zoe pushed the elevator call button.


Here, Sue and her family enter the elevator for their first ride.  Zoe's inclination was to push all of the buttons, but fortunately she was only tall enough to ring the alarm and push "1", which took all of us to the basement. 
After viewing the basement, Maya pushed the higher buttons to take us to the second floor.


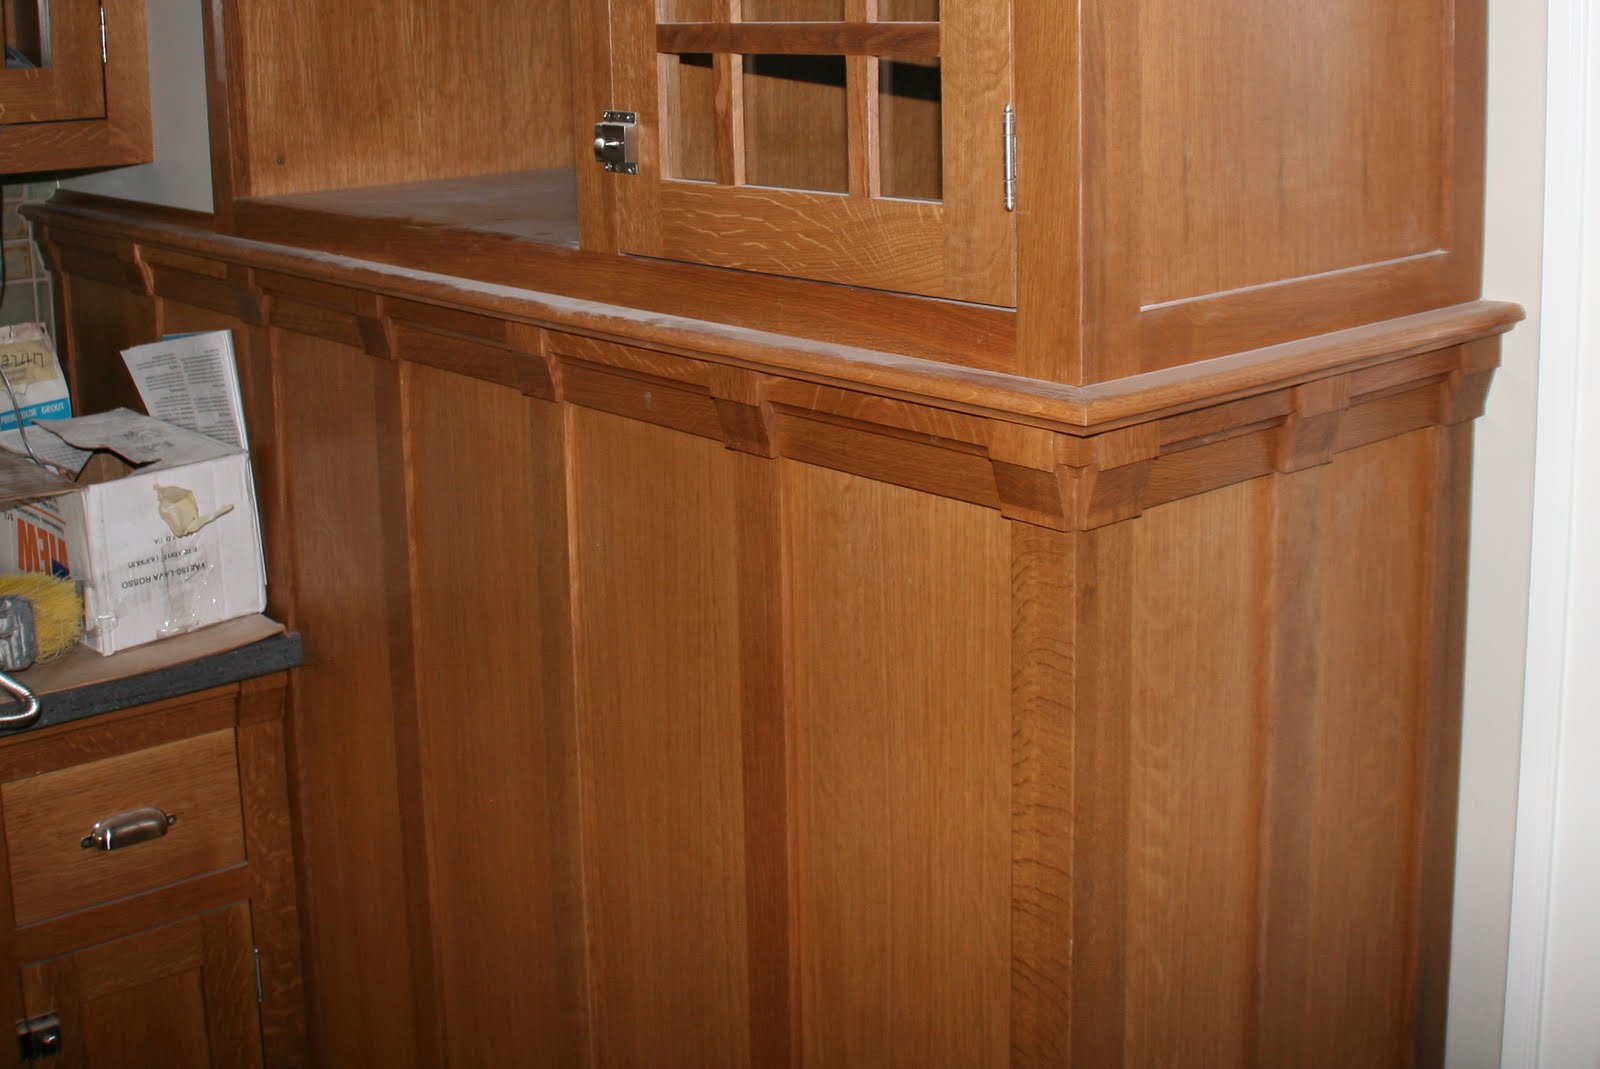
One of the delightful surprises when we engaged Eric Fulbright to build our kitchen cabinets was his idea of adding wainscoting on the north kitchen wall where fireplace brick used to be.  The wainscoting was Eric's design and included Craftsman touches that you can see in this photo at the top of the wainscoting.  We had planned from the beginning of the project to remodel the mantel in the living room but had initially planned a simple painted mantel.  Eric suggested that he could make us a nicer mantel out of the same quarter sawn oak he'd used for the kitchen cabinets, and he could build into it similar Craftsman touches borrowed from the wainscoting design.  The next photo will show you the result.


This is the new living room mantel designed and built by Eric Fulbright.


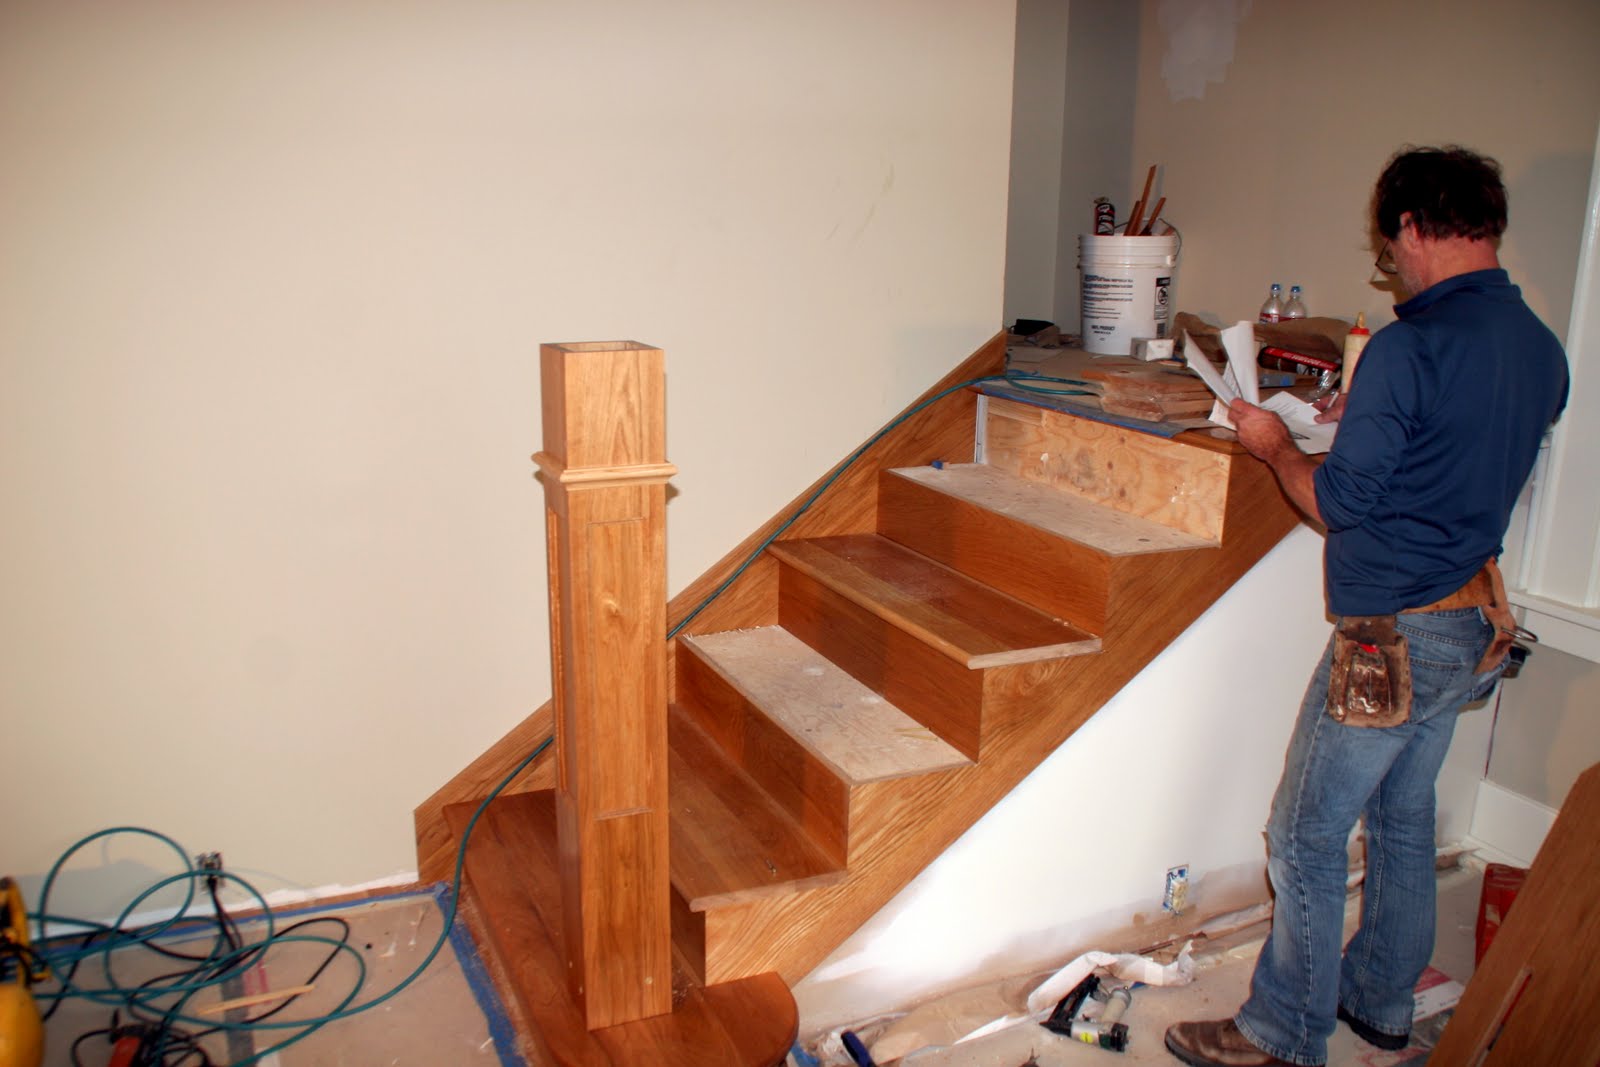
It is a big thrill to see a staircase that the BP and the BB designed from the LJ Smith catalog actually take shape in the house.  In this photo you see Tom, who, with his partner, Derek, are stair building experts and have been brought in by Bellingham Bay Builders to construct our staircase. 


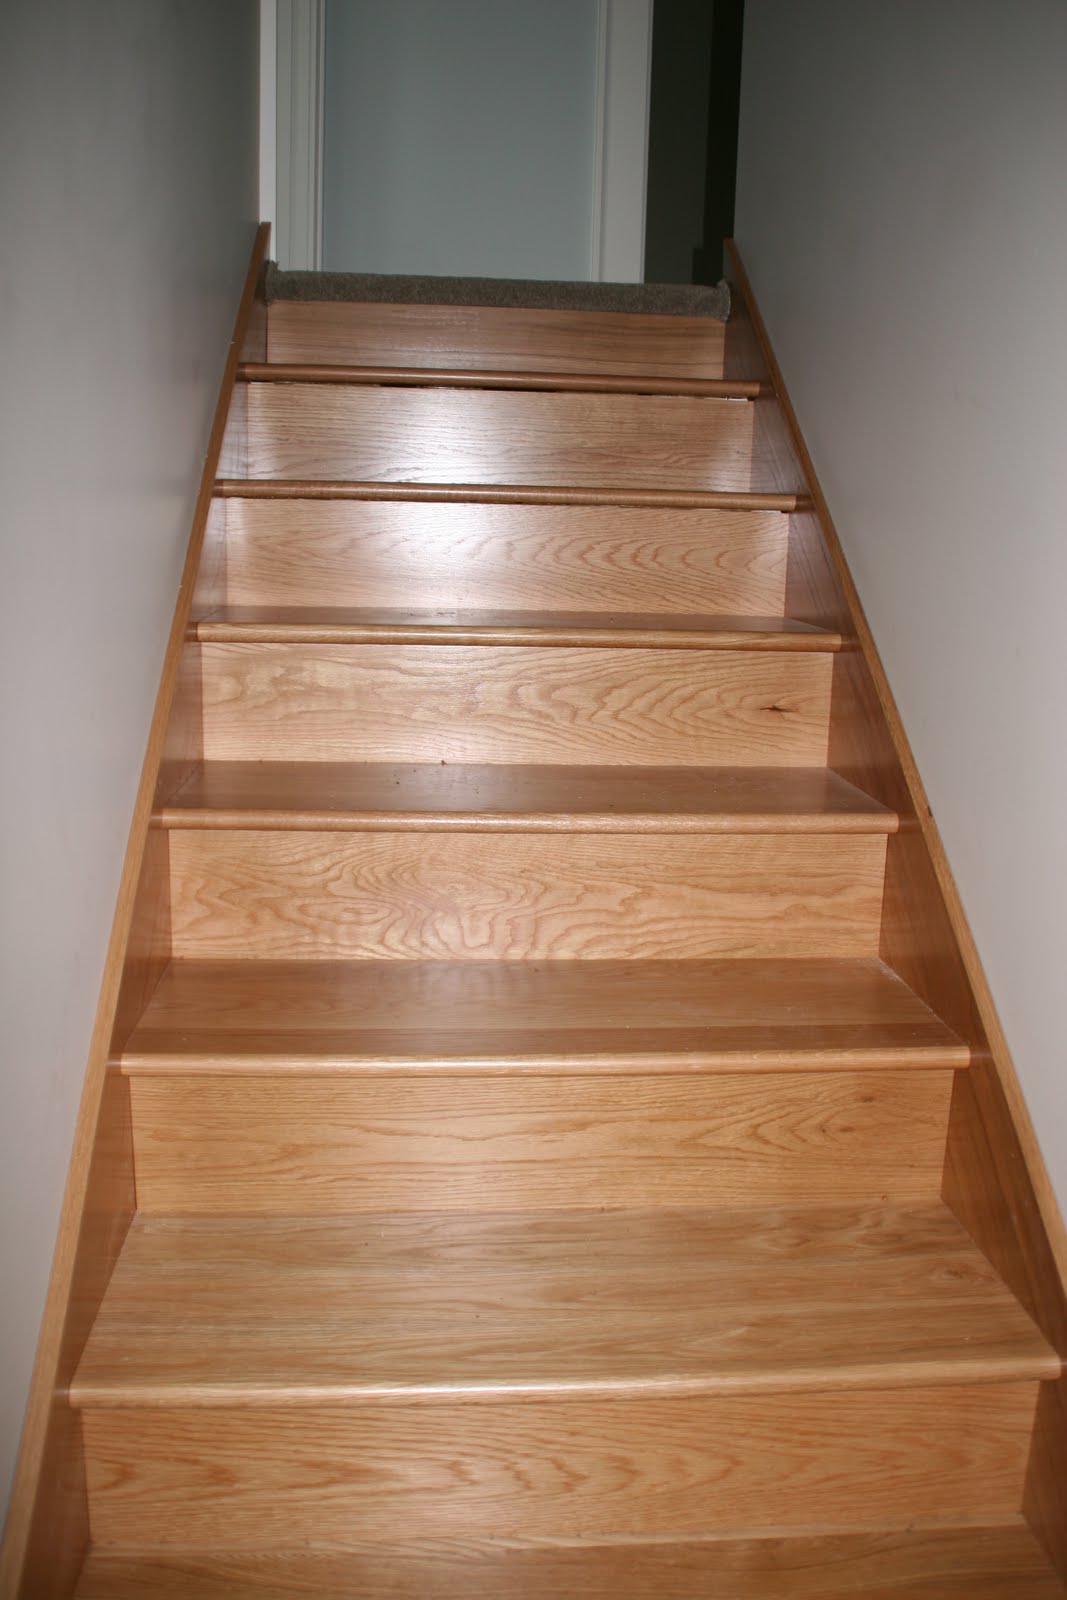
This is another view of the staircase.  The upper part of the photo also provides glimpses of the ceiling grids and the new wall sconce at the stairway landing.  This blog will be taking a holiday hiatus while we return to California for Christmas.  We anticipate one or two more blog installments in early January.  Stay tuned.  In the meantime, we hope you enjoy wonderful holidays.

Monday, December 3, 2012

Week 31: 3rd Down on the 2-Yard Line


The week began with a pouring of the concrete ramp for the exterior elevator door and the drainage apron in front of the garage.  In this photo, Dylan and Mike finish the concrete ramp outside the elevator door.

The concrete apron in front of the garage was extended to include this pad that anchors the fence posts at the west end of our rear fence.  In the past, settling of the ground in this area had caused our previous posts to list.  This concrete pad should keep everything upright.


This is the concrete apron in front of the garage.  Next week's blog will include a photo of the finished apron, which includes a drainage grate running across the face of the garage.  The grate is connected to our tightline drainage pipe and carries water from the apron out through our drainage system to the street in front of our house.


Several new appliances arrived this week.  The refrigerator was the first to arrive--that is, most of it.  The handle on the freezer door was broken and is being replaced in the next couple of days.  Otherwise, the refrigerator works great.  The few of you that are of our same generation will appreciate the fact that this is the first refrigerator that we've ever owned that includes the ice and water dispensing mechanism.  We feel absolutely on the cutting edge of kitchen technology.


This photo shows the new vanity countertop and water faucets for our upstairs bathroom vanity.  As you can see, in the right of the photo, a stack of drying doors prevents a photo of the entire vanity.


The tile installer began installing the tile for our kitchen backsplash.  This is a close-up of a portion of the backsplash tile--a pretty porcelain tile that we found at a Portland tile and marble manufacturer.  The good news was, we loved the tile; the bad news is, that between the time we decided on our tile design and the time we were ready to order the tile, the manufacturer discontinued all but a few parts of this particular line.  Our tile subcontractor managed to put together a similar design using some tiles that were different from the original plus some of the discontinued tiles that she located in the manufacturer's warehouse.  When the backsplash is completed, we will include a photo showing the entire installation in one of our later blogs.

On Monday of this week we were in Berkeley loading this truck with those remaining furnishings in our Berkeley house that we'd earmarked for Bellingham.  On Thursday morning, the truck arrived in Bellingham at 8 a.m.  The driver, Tim, was the crew chief in Berkeley.  He drove alone to Seattle, where he picked up his twin kids, Ryan and Jackie, and the three of them formed the offloading crew.  All three of them were fantastic and made very quick work unloading our possessions and delivering them to the various designated areas that had been cleared for this purpose.  The moving company is Moovers' Inc. (yes, two "o's").  The company was founded about 15 years ago by alumni of the Delancey Street program.  The same wonderful work ethic and spirit that characterized our experience with Delancey St. in moving us from Berkeley to Davis also characterized our experience with Tim and his crew.

The BP apologizes for this blurry photo, but we had to show a shot of Tim and Ryan carrying our prized dining room table across the backyard to the house.


On Thursday the elevator was not completely finished but was sufficiently operational that we could use it to transport heavy items to various parts of the house.  In this photo, Tim loads our dining room table onto the elevator while Ryan looks on.

This photo shows part of the space on the second floor that we cleared to receive some of the Berkeley furnishings and boxes.  The space in this photo is in the library.


We also stacked quite a bit of stuff in the master bedroom.  The other area that we used to store Berkeley stuff was the basement.  We kept the first floor entirely open because the painters had crews working furously to complete the painting of the trim throughout the first floor.


We're putting wainscoting in the dining room to match the wainscoting in this adjacent room that used to be the BB's office but now will be the pantry/playroom.  This photo shows a portion of the wainscoting in the pantry/playroom, which will be painted Graystone.

Our ceiling light fixtures in the living room were removed so that the painters could paint the 9-lite grids that have been attached to the ceiling around each light fixture.  This photo shows one of the two grids.


This photo shows how the crown molding and ceiling box grids look after being painted.  We are very pleased with the result.


Ditto


A big treat for us this week was that the existing downstairs bathroom was finally painted the new color we'd decided upon.  The color is "Tranquility."  It is a huge improvement over what was there before. 


Another exciting development this week was that the stair builders, Tom and Derek, arrived and began constructing the staircase.  The BP and the BB designed the staircase, using standard kit parts manufactured by LJ Smith Stair Systems.  The wood is white oak and looks sensational in the room.  The LJ Smith materials are beautiful and very well engineered.  Nevertheless, some fine carpentry is required to tailor the kit parts to the specific dimensions of our staircase, and Tom and Derek are wonderful at this.  In this photo, Derek is consulting the plans for the staircase design.


The stair builders bring their own tools and equipment.  In this photo, Tom is making a fine cut on one of the stair risers.


This photo shows the staircase as viewed from the first landing looking up to the second floor.  While we would be quite happy leaving the oak treads and risers fully exposed, we have decided, for long-term safety reasons, to install a carpet runner down the center of the staircase.  We will be using the same carpet material that was used to carpet the second floor.


And perhaps the most exciting development of all was that the elevator was completed and the state inspector signed off on our permit.  One initial hurdle to passing the state inspection was that the city electrical inspector had to sign off on the electrical sub panel installed in the elevator machine room.  The electrical inspector initially objected to the placement of the sub panel based on what everyone else concluded was a misunderstanding of the code.  We marshalled a response team, consisting of the electrical subcontractor and the elevator contractor and demonstrated that the placement of the sub panel was perfectly proper.  The electrical inspector reconsidered and concurred with the response team, provided that a cautionary sign be posted on the control panel (see next photo).  With that, the electrical inspector put his green tag on the sub panel, which is what the state inspector wanted to see before proceeding with the state inspection.


This is the finished elevator machine room with the new yellow caution sign required by the electrical inspector.


This is not the local telephone exchange.  It is the inside of the elevator control panel.  Looking inside the panel makes us appreciate that every time the elevator button is pressed, there is a lot of stuff going on here in the control panel.


Our elevator contractor, Marty McKinney, came back on Saturday to put the finishing touches on the elevator installation.  He had been accompanied by his older son, J.D. during the installation of the elevator.  On this final visit, he brought along his younger son, Trenton, who helped carry some tools and vacuum the elevator cab.


We now have a finished, fully inspected, and fully operational elevator.  The BB gets ready to take a ride.


The buttons in the elevator will take some getting used to.  The numbers on the buttons correspond to the number of stops the elevator makes.  The numbering starts in the basement.  So "1" is the basement; "2" is the exterior ground level door; "3" is the first floor of the house, and "4" is the second floor of the house.  It may take a while before we stop pushing the wrong buttons.

Saturday, November 24, 2012

Week 30: 2nd Down on the 3-yard Line


We were in California all this week and express our thanks to Susan and Chris for taking all of this week's blog photos before departing on their Thanksgiving trip to Portland.  In this photo you can see the east wall of the kitchen complete except for the dishwasher (resting in the garage), the refrigerator (to be delivered the day after the photo was taken), and the windows (resting upstairs while the paint dries).  To the left of the sink you can see the ceiling fixture that normally hangs in the living adjunct.  It turned out that our design for grid boards on the living room and living adjunct ceiling changed the ceiling dimensions and caused the fixture to be off center by a couple of inches.  For aesthetic purposes, a couple of inches is the same as a couple of miles, and we therefore asked that the electrical box for the fixture be moved so that it was exactly centered in the space defined by the grids.


A close-up of our new single bowl stainless steel sink that replaces the old dreadful porcelain double sink.  We are pleased to see that the garbage disposal, insta-hot water mixer and dishwasher overflow have also been installed.


The vanity countertop and water mixers installed in the upper bathroom.  The kitchen countertop is Corian.  This vanity countertop is a different material called Hi-Mac.  The sinks and coved backsplash are all an integral part of the countertop. so there are no seams to keep clean.


Susan took this photo for the benefit of anyone who wants to see what the inside of a doorbell looks like.  When we bought the house, the original doorbell had long since been disconnected.  We had used a wireless doorbell that worked ok, but the remodel gave us an opportunity to hard wire a new doorbell, the chimes for which are located in two locations--one downstairs near the kitchen and the other upstairs near the BB's and BP's offices.  This way, many years from now when we're old and deaf, we will hear the doorbell.  Of course by then we'll be too feeble to do anything about it.


A blazing fire in the gas fireplace.  The unit still needs to be trimmed, and we still need to address an issue that came up several months ago, which is that the fireplace radiates heat up into the kitchen cabinet installed above the brick fireplace base.  We think some additional venting is probably needed.


Now that we're getting down to the short strokes, there are numerous small items that need to be completed but are so varied that it's hard to keep track of them.  Lately we've been finding written checklists here and there around the house.  We think this particular checklist is something Dylan wrote down.  Throughout the project we've appreciated this attention to detail. 


This photo shows the new air return for the basement furnace.  Note the nice wood frame that the floor installer placed around the return box.  Metal trim has been added recently.  There remains a grate that will cover the opening.


This is a photo of the inside of the new coat closet that's under the staircase.  The photo shows the plywood door held closed by spring catches for access to a quite large storage space under the stairs.  One simply opens the spring catches, moves the plywood door aside, and enters the space.  Our original intent for the space was to store such things as Christmas ornaments, wrapping paper, etc.  Maya and Zoe have preempted the space, however, as they have declared it to be perfect as a playhouse.


Susan took this photo to show the beautiful new oak floor in the downstairs bathroom.  The original floor was fir that had been painted an awful gray and had decades of stains and scars.  The new floor really brightens up the room.  In the upper right corner you can see that the vanity for this bathroom has been reinstalled.


This photo shows a portion of the ceiling grids and crown molding in the living adjunct.  The main thing to notice in this photo is the beautiful mitred end cap that has been fashioned for the termination of the crown molding at this location.

Susan took this photo to show how beautiful the door trim looks after two coats of satin Alkyd paint have been applied.  To obtain a glass-like finish, the painters have sprayed all of the window and door trim, and the effect  is astonishing.


For the last many months whenever the subject of carpeting has come up, we've always been quick to note that carpeting comes at the end of the project.  As a result, we are thrilled to realize, and this photo evidences, that we are that close to the end of the project!  This photo was taken from the south end of the second floor looking north towards the BB's and BP's offices.  The entire second floor is being carpeted except for the bathroom, which has a tile floor.


The new upstairs furnace has been operating for a couple of weeks.  The painters have been leaving the furnace on to keep the upstairs warm and speed the drying of the doors and windows that are being painted upstairs, as well as the upstairs window and door trim and baseboards that have also been recently painted.  This photo shows the thermostat for the upstairs furnace.


A photo of the BB's office, showing the carpet being installed there.


A photo of the library showing the carpet being installed there.


And a photo of the master bedroom showing the carpet installed there and also showing the wall sconces recycled from the original living room.  In all of these photos of the carpet, the carpet appears to be brown.  In fact, the carpet is much lighter in color and has a quality about it that seems to change color, depending on the light, time of day, and color of the walls in the room concerned.  On several occasions, the BB and BP have tried to describe the color to others, and not once, to date, have they been able to agree on what the color really is.  We liked the carpet so much that we installed the identical carpet in the upstairs of our new condo in Davis. 


A photo of the north half of the new walk-in shower showing installation of the spray fixture and two of the three control valves.  The third control valve has not yet been installed because the tile crew needs to modify the opening for that valve so that the valve will fit properly.  There is no photo of the south half of the shower (where the fixed shower head is located) because, as you will see in the next photo, the bathroom has become the main storage area for windows and doors now that carpet is being installed in all the other spaces on the second floor.

This photo shows the doors and windows, all of which have been painted with Alkyd satin paint, drying.  To ensure that the paint fully cures, the painters have recommended a drying time of two weeks before they are reinstalled.


This is a timer control installed in the bathroom to govern the oversized exhaust fan that's being installed in the bathroom.  The local building code requires that such a fan be installed in a strategic location (in our case the bathroom is the best location) and placed on timer so that at regular intervals throughout the day, the exhaust fan automatically goes on, creating negative pressure in the house and thus drawing fresh air into the house through vents.


To remind themselves where the various windows came from that were painted and are now being stored in the bathroom for drying, our contractor put together this nifty schematic drawing.  Each window has a small piece of tape with a number on it, and the numbers on the windows correspond to the numbers on this drawing.


This photo shows the progress being made on the reinstallation of the "Andy Rodrigues" back porch.  It has been wonderful to see that the location of the back door is so close to the back door of the original house that the porch location has moved only an inch or so, and we've been able to reuse all of the infrastructure that Andy built back in 2007.


The new fence is complete and looks wonderful.  The builders followed exactly the design of the rear fence that Andy Rodrigues built for us in 2008.  This photo was taken from the front yard looking south and shows the fence between our house (on the right) and our neighbor's house (on the left).  You will see two gates in the fence.  The gate on the right is a 3' gate into our backyard.  On our neighbors' side of the fence, there was just room for a small 2 1/2' gate, and our neighbors elected to add it to the project.  So the gate that you see on the left opens into their backyard. 


This photo shows the middle and southernmost portions of the new fence between us and our neighbors to the east.


This photo looks north from our backyard.  The 3' fence gate that you saw in the earlier photo is in the upper left of this photo. The framing and rebar that you see is for a concrete pad and ramp that will serve the exterior door for the elevator.


This photo shows that the original fence built by Andy Rodrigues in 2008 has been fully reinstalled.  There has been one slight modification, which is that the small gate at the far end of the fence (nearest our garage) has been moved about 18" east to fit better with a changed location of the walkway that we plan to install.


The final element of our comprehensive drainage plan consists of a concrete apron in front of the garage door, with the drain grate that you see in the upper right hand corner of the photo.  This grate is connected to the 4" drainage pipe that runs around the garage and empties into the exterior sump.  The surface of the concrete apron will be sloped towards the drain grate.  The purpose of this final element is to prevent water from pooling in front of the garage and during heavy rainstorms, entering onto the garage floor.


This photo shows a continuation of the concrete apron in front of the garage door.  The apron will continue into this area to form a concrete pad in front of the back fence gate.  This pad will also stabilize the posts that support the gate.  In the past, those posts have tended to move in the soft ground that characterizes this part of the yard.  We believe the concrete pad will prevent such movement in the future.