 |
| We begin this week's blog by sending a big thank you to our daughter, Susan, who took ALL of the photographs for this week's blog. We were in California the entire week. Before we left Bellingham, we had posted notes for the electrician at every place where there would be multiple switches. The photo above shows one of those notes. We thank our designer, Luther, for suggesting that we focus on switch locations and post notes for the electrician to follow. |
 |
| So the electricians said they followed our notes, and when we went to double check, this is what we found. We have no reason to doubt the electricians, but the proof of the pudding will be when the switches are installed and we find out which switch switches which lights. By the way, the reason you see so many wires in this four-gang box is that two of the switches are three-way switches, and one switch is a four-way, all of which require more than just a couple of wires. |
 |
| The major event this week was the arrival and installation of the interior drywall. As we mentioned in an earlier blog, installation of the bedroom window had been deferred so that the drywall used upstairs could be delivered through the rough opening of the window. A robot-like forklift machine arrived to lift bundles of drywall to the second story. |
 |
| Ditto. Being an avid photographer, Susan could not resist taking this artistic black and white photo of the drywall delivery. |
 |
| Ditto |
 |
| Once the bundle was lifted to the bedroom window opening, members of the crew hand carried each 4x8 sheet of drywall through the window and into the upstairs hallway. |
 |
| Our granddaughters, Maya and Zoe, admire the newly drywalled dining room. |
 |
| This is the part of the inside kitchen wall that is above the remaining fireplace. The cut-out you see will be the back of the cabinet opening that we will use for our microwave oven. The oven will be plugged into an outlet in an upper cabinet. The wire for that outlet is shown at the top of this photo. |
 |
| In the living room looking toward the door to the kitchen (on the left) and the door to the pantry/playroom (on the right). |
 |
| This is not Alice's rabbit hole, although there are some startling resemblances. There are three openings here. The opening closest to Maya is a framed passageway from the living room to an alcove that serves the pantry/playroom, the downstairs bathroom, and a coat closet. Behind that is a second opening, which is a doorway to the coat closet. Behind that, the small opening is the access passageway to storage space under the stairs. |
 |
| This is a closer view of the access opening to the storage space under the stairs. It may turn out also to be an extra playhouse for Maya and Zoe. |
 |
| This is the first half of the stairway. It is in a space that used to be a bedroom but is now an open extension of the living room. |
 |
| This is the view from the lower landing of the stairway looking up toward the second floor. |
 |
| The miracle effect of drywall is that all of a sudden we have hallways and ceilings. This really is beginning to look like rooms and finished spaces. |
 |
| This is the library. In due course there will be a door to the furnace enclosure. |
 |
| Maya and Zoe in our new walk-in closet. |
 |
| The BB's office with drywall complete except for the well for the skylight. |
 |
| This is the work table built into the BB's office. The lower two-thirds is headroom for the staircase. The upper third will be open storage space. There will be a laminated table top installed near the end of the project, which will turn this architectural oddity into a very handy work table. |
 |
| This photo shows the skylight in the BB's office after installation of drywall in the well. |
 |
| Another shot of the skylight well that shows the interesting geometric shapes into which the drywall installers must cut their material to fit the contours of the well. |
 |
| This is the BP's office with all drywall installed except the skylight well. |
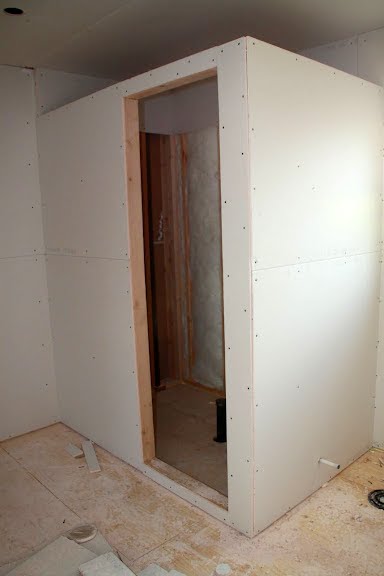 |
| The addition of drywall enables us to see for the first time what our walk-in shower really looks like in the upstairs bathroom. We have never owned a walk-in shower; this is very exciting for us! |
 |
| This is the east wall of the upstairs bathroom. The cutouts are for the two quarter sawn oak cabinets that our cabinet maker is making and that will hang above the oak vanity that he's also making. |
 |
| Maya and Zoe are walking past a stack of boxes of ProRoc all-purpose joint compound. Next to lugging around, cutting, fitting, and installing the sections of drywall, the drywallers' most important task is taping the joints between drywall sections and then smoothinig the joints with this compound. In a project like this, there are a lot of joints, and thus, a lot of compound. |
 |
| Showing that the drywall industry operates at both ends of the technological spectrum, compare these tools for applying joint compound with the robotic drywall forklift that we showed you earlier in the blog. |
 |
| One of the first areas to be taped and compounded was the elevator shaft. This shows the top of the shaft; the two rings are securely bolted to a header above the ceiling drywall. The elevator installer will insert a bar through the rings and use it to hoist elevator parts up and down the shaft. |
 |
| Looking down the elevator shaft from the second floor. |
 |
| This shot of the elevator shaft from the first floor shows the exterior doorway that will provide access to the elevator from the outside walkway. |
 |
| While drywall is beginning to provide a finished look to the inside, Bellingham Bay Builders crew is taking the first step toward providing a finished look to the outside. This step involves wrapping the house in DuPont Tyvek and DrainWrap. This stuff is a little different from ordinary house wrap. It includes the usual "breathing" vapor barrier, but on the inside surface, it also includes vertical ribs that would allow any major amounts of water to flow down to the bottom of the wall and then out through flashing that will be installed at the bottom. The idea is to provide enhanced drainage in extra wet areas. The siding will be installed over this drain wrap. |
 |
| Ditto |
 |
| This is how the front of the house looked at the end of the week. |
 |
| We couldn't resist including this additional photo taken at the end of the week, which provides photographic evidence that Bellingham Bay Builders are well-connected to forces from above. |
No comments:
Post a Comment