Sunday, June 24, 2012

Week 8: Moving from The Big Pour to The Big Frame

Dylan uses a laser leveler to place snap lines that will determine the slope of the basement slab.


The pump truck and cement mixer arrive for the final big pour of the project.


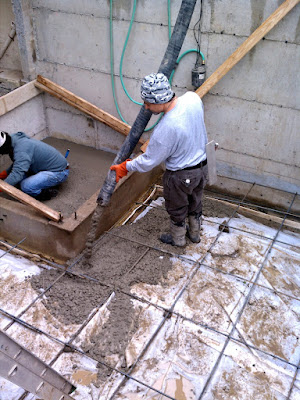
The pump truck operator positions the pump hose for the slab pour.


Pouring the slab at the base of the elevator shaft.  Most of this day's photos were taken by Susan while we were still in Berkeley and Davis.  Thank you, Susan.


Our thanks to Dylan, who sent us this photo.  The elevator floor slab is being finished, and the pour is now moving to the main basement floor slab.


a  nice close-up taken by Susan

In this photo, taken by Susan, Dylan is in the right background, the pump truck operator is standing on the ladder, and one of the two cement finishers is pouring the main slab.


Another Susan view of pouring the main slab.  Yes, the ladder was pulled up before the pour was completed, and yes, the cement guy was able to escape through an opening not visible at the bottom of the photo.


Ditto


Another Dylan photo--finishing the main slab

The finished slab.  Everyone held their breath, waiting for leaves, twigs, or maybe even an errant squirrel to fall on the fresh cement from the trees above, but there were no mishaps.


This photo of the finished slab shows the sump in the northwest corner of the basement.  The slope of the slab was structured so that any water in the basement flows to this corner.


A couple of days later, the crew backed a cement truck into our backyard and poured cement into 5 gallon buckets, which were carried down the ladder to pour the last remaining parts of the basement--the steps leading to the old basement, just to the left of center in this photo, and the remaining two foundation walls of the elevator shaft.  Those two items, together with one additional footing that was added in the old basement, completed the Big Pour.


Close-up of the completed elevator shaft foundation


The north and east elevations of the house just before commencement of the installation of new structural posts and shear walls.


At the left in this photo is the new post on the west elevation of the house.  After tying down this post, a shear wall, consisting of half inch plywood, will be applied to the face of the wall.  This post is one of ten new posts that will provide the main support for the second story, and the shear wall at this location is one of eleven shear walls being installed in the house.


This is the south end of the west elevation of the house--on the right of the photo is another post, and a shear wall will be installed at this location, as well.


Another post at the northwest corner of the house


Another view of the post at the northwest corner; a shear wall also will go here.  Note the large metal bracket at the base of the post and a similar bracket at the base of the stud opposite the post.  These brackets are part of a mechanism that ties the entire house to the foundation.  See close-up in next photo.


This is a close-up of the tie-down bracket described above.  The large bolt extends through the plate down into the crawl space, where it is attached to a bracket bolted into the side of the foundation.


Another post and shear wall on the east elevation of the house.  The two large windows nearest us in the photo are the living room windows.


The post at the northeast corner of the house.  All of the posts are 4x6 cedar timbers.


Another shear wall will be installed here at the east end of the north face of the house


One of two interior posts.


At last, our inaugural stud wall!  The wall is structured to the right of the steps.  The plywood above and to the left of the steps is temporary covering, closing that opening for safety reasons.  But the wall you see to the right of the steps is a complete stud wall, the lower portion of which is covered by shear wall material.  This wall officially launches the framing stage of our project!


A closer look at our inaugural stud wall


Close-up of a portion of the shear wall, which shows both the shear wall material and also the closely-spaced nailing that adds lateral strength to the shear wall structure.


The white box beam in this photo is one of two beams that support the original roof over our front porch.  If you look closely at the left end of the box beam, you will see that the geniuses who built this in 1925 decided to attach this structural member to the house siding, rather than to a structural part of the house.  Amazingly, the porch roof has weathered the years, including loads of winter snow, without incident.  The temptation is to think that we may have discovered a useful new engineering concept.  Upon reflection, we have decided to fix the structural anomaly before putting the front of the house back together.


Before the commencement of this project, this was our bedroom.  The previous owners of the house had constructed stairs to the attic and had finished the attic with carpet and drywall.  All of these finishes are now lying in a heap, waiting to be recycled when the roof comes off in about two weeks.


The rear of the house and yard as they looked at the end of the week.  The most exciting addition to the yard are the framing materials shown in the lower left corner of this photo.


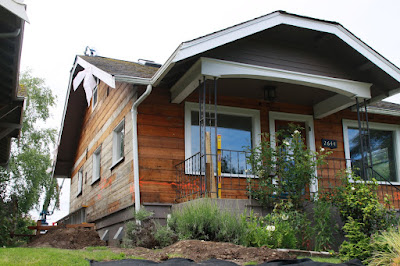
The front (north elevation) of the house as it looked at the end of the week.  Our engineer, Jason Bourne, has added his sign to the front lawn.  He has earned the advertisement--as you have already seen, there is a ton of engineering in this project, with much more to come.


Ditto


Ditto


No comments:

Post a Comment