Monday, June 18, 2012

Week 7: While We Were Gone------

During week seven, we were away in San Diego hosting our annual family vacation.    For this week's photos, we are indebted to Luther Allen, our designer, who took thirteen of these photos, and Dylan Hicks, our on-site superintendent, who took the other two.  This photo shows removal of the existing siding from the house.  Containment procedures were required because the existing siding contains lead.


Ditto

Ditto.  This photo also shows the exterior sump (the aqua green tube) and pea gravel that arrived prematurely to the site (more on this below).


In the upper left of this photo, siding removal is still underway.  In the lower right corner, two sections of old clay drain pipe can be seen.  The photo also shows that some gravel backfill has been placed by the excavator into the trench next to the foundation.  More on this below.


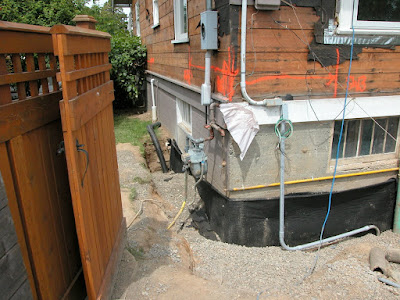
This photo has an additional view of the gravel backfill added by the excavator.  This backfill was supposed to be added only after the basement floor slab had been poured.  This produced some excitement for a couple of days, but we received good news from our engineer.  Thanks to a special fast-setting formula that our contractor had prescribed for the concrete used for the basement walls, the basement walls turned out to be strong enough to tolerate the early partial backfill.  The hose-like line running through the center of the photo is our main water line.


another view of the partial backfill


Inside the new basement walls, the gravel is laid down as a base for the floor slab (to be poured next week).  The square in the lower right hand corner of the photo is a portion of the foundation for the elevator shaft.  The notch in the foundation in the center of the photo is where there will be two steps leading from the new basement slab to the slightly higher existing slab of the old basement.


This is the exterior sump, 24 inches in diameter, that will receive water from our new drainage system and pump it to the front of the house down the new drainage pipe to the storm sewer in South Park Drive.


  As you can tell, we just love sumps.  We already have a small sump near the crawl space of our existing basement.  The previous photo shows the new 24" exterior sump we're adding for our rain and ground water drainage system.  This photo shows an 18" diameter sump we are adding at the low point in the new basement slab to pick up any spilled or seeping water in the new basement and pumping into the sewer. 


Dylan took this, and the following, close-ups of the new 18-inch basement sump.  This photo shows the inside of the sump with a water primer connection and electrical box into which the electric pump will be connected.  The bottom of this sump is sealed off.  The theory is that this sump is not primarily for gound water but  for water that might spill in the basement, for example, soapy water from the washing machine.  Since there is the potential for soap and other such substances to be in spilled water, the sump must pump into the sewer rather than the storm drain.


This is Dylan's photo of the outside of the 18-inch basement sump.  The photo also shows the water connection, the electrical conduit, and in the right center of the photo, the sewer connection.

This photo shows preparations for the pouring of the new basement slab.  The white sheet laying over the pea gravel is a 6 mil polyethylene vapor barrier, on top of which the steel rebar has been laid.  Still yet to be formed are the final two sections of the foundation for the elevator. 


A view of the east side of the house showing the partial backfill along that side


A view of the southwest corner of the house showing the partial backfill, completion of siding removal, and repair of the electrical conduit line that carries electricity to the garage and was broken during the excavation process


A view of the rear of the house taken near the end of the work day on Friday


No comments:

Post a Comment