Saturday, November 24, 2012

Week 30: 2nd Down on the 3-yard Line


We were in California all this week and express our thanks to Susan and Chris for taking all of this week's blog photos before departing on their Thanksgiving trip to Portland.  In this photo you can see the east wall of the kitchen complete except for the dishwasher (resting in the garage), the refrigerator (to be delivered the day after the photo was taken), and the windows (resting upstairs while the paint dries).  To the left of the sink you can see the ceiling fixture that normally hangs in the living adjunct.  It turned out that our design for grid boards on the living room and living adjunct ceiling changed the ceiling dimensions and caused the fixture to be off center by a couple of inches.  For aesthetic purposes, a couple of inches is the same as a couple of miles, and we therefore asked that the electrical box for the fixture be moved so that it was exactly centered in the space defined by the grids.


A close-up of our new single bowl stainless steel sink that replaces the old dreadful porcelain double sink.  We are pleased to see that the garbage disposal, insta-hot water mixer and dishwasher overflow have also been installed.


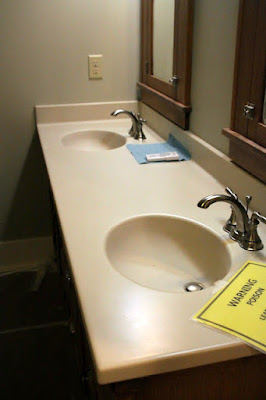
The vanity countertop and water mixers installed in the upper bathroom.  The kitchen countertop is Corian.  This vanity countertop is a different material called Hi-Mac.  The sinks and coved backsplash are all an integral part of the countertop. so there are no seams to keep clean.


Susan took this photo for the benefit of anyone who wants to see what the inside of a doorbell looks like.  When we bought the house, the original doorbell had long since been disconnected.  We had used a wireless doorbell that worked ok, but the remodel gave us an opportunity to hard wire a new doorbell, the chimes for which are located in two locations--one downstairs near the kitchen and the other upstairs near the BB's and BP's offices.  This way, many years from now when we're old and deaf, we will hear the doorbell.  Of course by then we'll be too feeble to do anything about it.


A blazing fire in the gas fireplace.  The unit still needs to be trimmed, and we still need to address an issue that came up several months ago, which is that the fireplace radiates heat up into the kitchen cabinet installed above the brick fireplace base.  We think some additional venting is probably needed.


Now that we're getting down to the short strokes, there are numerous small items that need to be completed but are so varied that it's hard to keep track of them.  Lately we've been finding written checklists here and there around the house.  We think this particular checklist is something Dylan wrote down.  Throughout the project we've appreciated this attention to detail. 


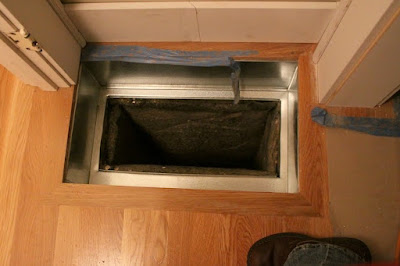
This photo shows the new air return for the basement furnace.  Note the nice wood frame that the floor installer placed around the return box.  Metal trim has been added recently.  There remains a grate that will cover the opening.


This is a photo of the inside of the new coat closet that's under the staircase.  The photo shows the plywood door held closed by spring catches for access to a quite large storage space under the stairs.  One simply opens the spring catches, moves the plywood door aside, and enters the space.  Our original intent for the space was to store such things as Christmas ornaments, wrapping paper, etc.  Maya and Zoe have preempted the space, however, as they have declared it to be perfect as a playhouse.


Susan took this photo to show the beautiful new oak floor in the downstairs bathroom.  The original floor was fir that had been painted an awful gray and had decades of stains and scars.  The new floor really brightens up the room.  In the upper right corner you can see that the vanity for this bathroom has been reinstalled.


This photo shows a portion of the ceiling grids and crown molding in the living adjunct.  The main thing to notice in this photo is the beautiful mitred end cap that has been fashioned for the termination of the crown molding at this location.

Susan took this photo to show how beautiful the door trim looks after two coats of satin Alkyd paint have been applied.  To obtain a glass-like finish, the painters have sprayed all of the window and door trim, and the effect  is astonishing.


For the last many months whenever the subject of carpeting has come up, we've always been quick to note that carpeting comes at the end of the project.  As a result, we are thrilled to realize, and this photo evidences, that we are that close to the end of the project!  This photo was taken from the south end of the second floor looking north towards the BB's and BP's offices.  The entire second floor is being carpeted except for the bathroom, which has a tile floor.


The new upstairs furnace has been operating for a couple of weeks.  The painters have been leaving the furnace on to keep the upstairs warm and speed the drying of the doors and windows that are being painted upstairs, as well as the upstairs window and door trim and baseboards that have also been recently painted.  This photo shows the thermostat for the upstairs furnace.


A photo of the BB's office, showing the carpet being installed there.


A photo of the library showing the carpet being installed there.


And a photo of the master bedroom showing the carpet installed there and also showing the wall sconces recycled from the original living room.  In all of these photos of the carpet, the carpet appears to be brown.  In fact, the carpet is much lighter in color and has a quality about it that seems to change color, depending on the light, time of day, and color of the walls in the room concerned.  On several occasions, the BB and BP have tried to describe the color to others, and not once, to date, have they been able to agree on what the color really is.  We liked the carpet so much that we installed the identical carpet in the upstairs of our new condo in Davis. 


A photo of the north half of the new walk-in shower showing installation of the spray fixture and two of the three control valves.  The third control valve has not yet been installed because the tile crew needs to modify the opening for that valve so that the valve will fit properly.  There is no photo of the south half of the shower (where the fixed shower head is located) because, as you will see in the next photo, the bathroom has become the main storage area for windows and doors now that carpet is being installed in all the other spaces on the second floor.

This photo shows the doors and windows, all of which have been painted with Alkyd satin paint, drying.  To ensure that the paint fully cures, the painters have recommended a drying time of two weeks before they are reinstalled.


This is a timer control installed in the bathroom to govern the oversized exhaust fan that's being installed in the bathroom.  The local building code requires that such a fan be installed in a strategic location (in our case the bathroom is the best location) and placed on timer so that at regular intervals throughout the day, the exhaust fan automatically goes on, creating negative pressure in the house and thus drawing fresh air into the house through vents.


To remind themselves where the various windows came from that were painted and are now being stored in the bathroom for drying, our contractor put together this nifty schematic drawing.  Each window has a small piece of tape with a number on it, and the numbers on the windows correspond to the numbers on this drawing.


This photo shows the progress being made on the reinstallation of the "Andy Rodrigues" back porch.  It has been wonderful to see that the location of the back door is so close to the back door of the original house that the porch location has moved only an inch or so, and we've been able to reuse all of the infrastructure that Andy built back in 2007.


The new fence is complete and looks wonderful.  The builders followed exactly the design of the rear fence that Andy Rodrigues built for us in 2008.  This photo was taken from the front yard looking south and shows the fence between our house (on the right) and our neighbor's house (on the left).  You will see two gates in the fence.  The gate on the right is a 3' gate into our backyard.  On our neighbors' side of the fence, there was just room for a small 2 1/2' gate, and our neighbors elected to add it to the project.  So the gate that you see on the left opens into their backyard. 


This photo shows the middle and southernmost portions of the new fence between us and our neighbors to the east.


This photo looks north from our backyard.  The 3' fence gate that you saw in the earlier photo is in the upper left of this photo. The framing and rebar that you see is for a concrete pad and ramp that will serve the exterior door for the elevator.


This photo shows that the original fence built by Andy Rodrigues in 2008 has been fully reinstalled.  There has been one slight modification, which is that the small gate at the far end of the fence (nearest our garage) has been moved about 18" east to fit better with a changed location of the walkway that we plan to install.


The final element of our comprehensive drainage plan consists of a concrete apron in front of the garage door, with the drain grate that you see in the upper right hand corner of the photo.  This grate is connected to the 4" drainage pipe that runs around the garage and empties into the exterior sump.  The surface of the concrete apron will be sloped towards the drain grate.  The purpose of this final element is to prevent water from pooling in front of the garage and during heavy rainstorms, entering onto the garage floor.


This photo shows a continuation of the concrete apron in front of the garage door.  The apron will continue into this area to form a concrete pad in front of the back fence gate.  This pad will also stabilize the posts that support the gate.  In the past, those posts have tended to move in the soft ground that characterizes this part of the yard.  We believe the concrete pad will prevent such movement in the future.

No comments:

Post a Comment